Tuesday, October 2, 2012

Purchase Single Stamps for a Limited Time!!!

Have you ever wished you could just buy one particular stamp from a set? Well for a limited time, here is your chance!


Promotion Details: Now through January 2, 2013

•These stamps are available on any order type-customer, workshop, or online.
•To find the item numbers, click on the flyers.
•Your stamp will not come in a cd case or plastic box; they'll be packaged in cello bags. If you'd like a case for your stamp, you will need to purchase one on your own.
•This offer is available for clear-mount stamps only.
•No clear block will come with your stamp, if you don't have one you will need to purchase one. The recommended block sizes can be found on the flyers.
•No limit, purchase as many as you would like.
•Remember that this is a pilot program, so take advantage of it while you can!

The following 3 Stamps Sets are up for individual ordering...

Seasonal Sayings: http://204.228.150.61/docs/singlestamps/SSF_Word_Play.pdf click for pricing

Perfectly Penned: http://204.228.150.61/docs/singlestamps/SSF_Word_Play.pdf click for pricing

Word Play: http://204.228.150.61/docs/singlestamps/SSF_Word_Play.pdf click for pricing


Wednesday, August 1, 2012

Teacher Tote #3

This teacher box is for my older sons male teacher.  He had only one so the ladies were easy to do totes for.  I made his to be a simply fancy favor box and turned it into a "Teachers Survival Kit".  Its filled with red pens/sticky note pad, and the items on the list.

Band Aid:  for when things get a little rough
Crayon: to color every day bright and cheery
Marbles:  to replace those you might lose from time to time
Mounds Cnady Bar: for the mounds of knowledge you share
Paper Clip: for when you need help holding things together
Rubber Band: to remind you to be flexible
Starburst Candy: to give you a burst of energy
Shiny Penny: to remind you that each will shine in his or her own special way
Eraser: to remind you that everyone makes mistakes
Animal Cookies: for when your class seems like a zoo
Toothpick:  to help "pick" out the good qualities in others

Teacher Tote #2

Here is another tote for my older sons Language Arts Teacher.  I made one of Becky Roberts cute little pocketbooks.  Head on over to her blog to get the instructions to make these are others, http://www.inkingidaho-tutorials.blogspot.com/

I filled this tote with the same items.

Teacher Tote #1

I have been working on teacher gifts for "Meet the Teacher Day".  Each year, I make a little something special and fill it with teacher items.  This tote, I made two of, one for each of my sons main teacher.  I filled them with red ink pens, decorated sticky note pad, mints and 4 3x3" thank you note cards and envelopes.  I have the pattern for the tote.  Email me directly if you would like to have it.  It is super easy to make.

Monday, July 23, 2012

Googly Ghouls Swing Card

This little cutie, is called a swing card.  This is a card we will be making as a class i'm offering at my all day crop, August 18th.  Halloween is one of my favorite holidays next to Christmas. And  this little frankie is a sneak peak from a cute stamp set thats in the Holiday Catalog.  The gray polka dotted DSP is from the "Howlstooth & Scaringbone" DSP also in the new Holiday Catalog.  Sounds like you really need to get your hands on one, to see what's all inside.  Never to early to start making those Christmas Wish Lists, but if you can't wait, I'm on stand by to take orders starting August 1!!!

I used the spiderweb embossing folder to emboss the front left of card the just the side of the vanilla layer for the inside.  I also used the new Apothecary Accents Framelits to make the piece that swings.

Orchard Harvest Milk Carton

 Good evening bloggers!  Sorry I have not posted in a while.  I have had a busy Summer!  I have been stamping though, I promise!!  Any whooo, I thought I would post the projects for my August Stamp Club.  I always make two other projects to show how the paper, stamps etc., can be used for other types of projects besides cards.  I have a mixed group of gals in my club so I like to mix it up for them.  This photo shows the mini milk carton using the new Orchard Harvest DSP from the holiday catalog.  We are also making rosetta's.
 This is the card that goes with the whole theme.  I used the same DSP pack, and the new woodgrain embossing folder.
Ok for the grand who ha.....this is the scrapbook page each club member will make.  We are using the same DSP pack for the stipes, embossing folder for the "FALL letters" and the Gently Falling stamp set.

If you are interested in receiving a new Holiday Catalog to learn about all the new wonderful holiday goodies, email me and I will be sure to slip you one in the mail.

Sunday, June 3, 2012

Introducing New Firm Foam Ink Pads!


With the introduction of the 2012-2013 Annual Catalog, Stampin’ Up! has made a very big change to our Stampin' Pads—NEW Firm Foam pads! They change your stamping experience for the better. You’re going to love these new Stampin' Pads—just look at all the exciting benefits listed below:
•Provide better ink coverage for your stamps!

•Light-tap stamping produces flawless images!

•Create wonderfully solid images. The Firm Foam releases more ink onto your rubber stamp than the felt pads. When using the Firm Foam pad, your stamp will get an even, solid covering of ink that you may not have been able to achieve with the felt pads. Please note: if you are using the ink pad frequently you may need to re-ink your Firm Foam pad more often.

•Have a crisply printed, glossy label on the top of the pad that is easier to read and that will not fade or chip off!

•Come with color name labels in all four languages (English, Spanish, French, and German)—just choose your language, peel it off the back, and add it to the side of the pad for easy identification!

•Use the same patented flip-top case design that stores the inking surface upside down, so the pad surface stays moist!

•Are available in all colors, including our exclusive In Colors!

Please note: Five ink colors have undergone formula changes to improve functionality and color stability with the new firm foam pads. These colors are:

•Basic Black
•Basic Gray
•Marina Mist
•Perfect Plum
•Tempting Turquoise

All five colors of the reformulated inks have been fully tested and approved. While using the new ink formula in the old Stampin' Pads is fine, we do NOT recommend using the old ink formula in the new firm foam pads. Beginning June 1, all Ink Refills and Classic Stampin' Pads will contain the newly formulated ink.
All individual firm foam pads are now available for order; however, Stampin' Up! has run into some packaging constraints with the collection packs which may temporarily cause a backorder situation. They expect to resolve this situation soon, and the following items will begin shipping the week of June 11.
#126987: Brights Collection Classic Stampin' Pads

#126988: Subtles Collection Classic Stampin' Pads

#126989: Regals Collection Classic Stampin' Pads

For more information, check out this PDF with frequently asked questions.on the new stamp pads:
http://www.stampinup.com/us/enu/22579.asp

Have Your Cake Sign On Special Offer!

Have Your Cake!!
June 1-30, 2012 ONLY so Hurry!!

For just $99, join Stampin' UP! and get:

*  Up to $125 worth of products that you choose!
*  Nearly $50 worth of FREE products from our Patio Party Suite!
*  FREE shipping

Click the link for flyer and all the exciting details!
http://www.stampinup.com/us/documents/Flyer_RecruitPromo_Demo_June0112_US.pdf


We (Heart) Our Hostesses!!

June 1 - July 31, 2012
$115
Of FREE
New-Catalog
PRODUCTS

Thought about hosting your own Stampin' Up workshop party to earn some FREE items.  Well now is the time to do so.  Bask in the extra $50 in FREE products you'll receive when you host a friend-filled party that celebrates your creativity.  The $50 of FREE products is in addition to the already great FREE money you will earn towards great products from our NEW Catalog.

Contact me now so we can set a date and talk about all the wonderful new items you want to earn for FREE!!

Click link for flyer and all the details!

Wednesday, May 30, 2012

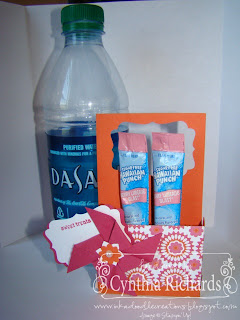
Drink Treat Box

I came across this super cute idea for drink treat boxes at http://www.gettincrafty.typepad.com/.  She has a great tutorial for you to follow as well as instructions.  Right now she is offer FREE blog candy if you make one and post it to your blog and enter her contest, whooo hoo!!!

I used the new summer smooches DSP for the front of mine along with a cute little pin wheel.  I used the decorative label punch and stamped "sweat treats" on the front.  I think I may have one of these made for each of the ladies who are coming to my all day crop in June.  These would make super cute table favors for them!!

Wednesday, April 25, 2012

Now is the time to be thinking about those stamp sets you have putting off buying.  Stampin' Up has released the list of retiring stamp sets and well as the list for all accessories.  Boy oh Boy are there gonna be some changes!  Please take note of a few changes listed below, it may help you decide what items you want to purchase before they are gone or reorganized in away that it prevents you from getting items you want to have.

Click the below link to take you to the retired list of Stamp Sets to reture as of May 31, 2012.
http://204.228.150.61/docs/lastchance/en-US/RetiredStamps_0412_en-US.pdf

Click the below link to take you to the retired list of Accessores (including DSP, Inks, Cardstock, Bigz Dies, Ribbons and much more...)  The items in this list are only AVAILABLE WHILES SUPPLIES LAST!!  (I just place my large order this morning at 7:30am)
http://204.228.150.61/docs/lastchance/en-US/Availability_en-US.pdf

1)  When you look at the retired accessories list, you'll note that all of our Stampin' Pads are listed. This is for two reasons: (1) Craft Stampin' Pads will now only be available in black and white; and (2) we are introducing a new Firm Foam pad in our Classic Stampin' Pads with the 2012-2013 annual catalog.  The Firm Foam pads offer better ink coverage and, in turn, better stamped images.

2)  Only select Stampin' Write Markers will be available individually (Stampin' Write Markers in color collections will continue to be offered) This is important, cause if you are like me, I did not buy them in collections, I got them one by one as I chose to get ink pags, so now there are a few that I need to go along with misc. stamp pads.  I just purchased all the single ones I needed so that I don't have to purchase the whole collection just to get one or two single colors.


•12" x 12" Textured Card Stock will no longer be offered

•12" x 12" Smooth Card Stock will only be available in select individual colors and color collections
(not sure about the details on this yet, but I am thinking they are only gonna offer collections or singles of certain colors, I again stocked up on all the colors that I may not be able to get in single pack colors.)

I am on stand by to answer any questions and help you place any orders that you are ready to place.  Remember stamp sets retiring are available until the end of May, while accessores are only available while supplies last!!


Saturday, March 31, 2012

April Stamp Club Projects

 Ok bloggers, since tomorrow is my monthly stamp club, I guessed it was ok to go ahead and most what we are making.  This month is a Mother's Day flower pot card.  But what makes this card cool, is that it stands up.  The above picture is a 3-d item made using the Mixed bunch stamp set (this is set we are using to make the card with).  It is just a mini composition book, so its perfect to carry in your pocketbook.
 This is the card we are making, but it will stand up like the one below.  I couldn't decide which paper pack and ribbon to use, but decided based on the cool new brights.
 Test model!  I do like this one too.  I like how it can stand up for display.
This is the one I really love.  Its the scrapbook page, showing how the same stamp set can be used for cards, scrapbooking and 3-d items.

Friday, March 30, 2012

Boy Bunny Basket

Ok, bloggers heres the funny story about the boy bunny.  I made three totes all different with these cute bunnies on the front for my two sisters and neice for Easter.  My neice has been trying to get info. from me on what I am making for them but I wouldn't tell her.  I did however show her a picture of the one I made for her mom.  Here's the funny part, her boyfriend has been asking her what I am making for them and why I was asking what their favorite colors were.  He also asked if he was gonna get one too.  He's a big kid and didn't want to be left out, Sooooo.  This one is for Cubby!  I did use grey (his favorite color) and dressed the bunny up with some blues, plaid shirt and a baseball cap on top.  So what do you think??

Thursday, March 29, 2012

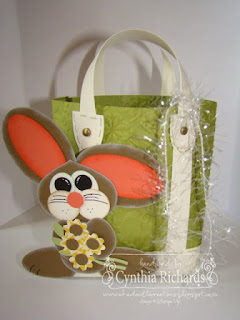
Easter Bunny Totes

 Good morning bloggers!  Have not posted in a while and shame on me.  I've got to get my butt back into the grove here.  I swear I'm making, stampin and creating, just not posting what I do:(  Any who, I've made these bunnies before from the talented Kay over at http://creationsonpaper.blogspot.com/2011/03/easter-pals.html.  Click on over and find out how to make these awesome bunnies.  I've also bought the instructions from her on how to make these cute mini totes.  So when I checked out one of my daily inspiration blogs "Linda" over at http://lindas-stampinloft.blogspot.com/ and saw how she used both together, I knew right away these were gonna be my Easter treats for sisters and neice this year!  The one above goes to my oldest sister, she wanted spring colors, so I used Pool Party with Island Indigo.  I added a cute vest coat to the white bunny from the Owl Punch using the Everyday Enchantment DSP from the Sale a Bration catalog (which by they way, this is your last week to get this awesome paper pack).  Get it FREE for every $50 order you place!!  HINT! HINT!
 This one is using Whisteria Wonder paper and its for my neice.  Its her favorite color and I used the largest heart from the Heart to Heart Punch to add to the tote.  I also added a cute bow to the neck of the Soft Suede bunny. 
This Lucky Limeade tote is for my other sister.  I think her favorite color is green, (oh well, she will like it anyway!!)  This bunny has Colipsol (spelled wrong I know-don't feel like going and getting catalog!) Coral for ears and nose.  He is holding a bunch of flowers made from the Boho Blossom Punch.  The stem is from the Bird Punch.  Hope you have enjoyed my version of Easter buny totes.  I have a list of punches below for making the bunny.

*  xlarge oval punch for outside of ear
*  large oval punch for inner ear, hands and feet
*  ornament punch for head
*  owl punch with feet and ears cut off for the body
*  bird punch wing for the large part of eye
*  3/8" circle punch from the itty bitty set for black eyes and nose
*  1" circle for the cheeks
*

Tuesday, February 28, 2012

March Stamp Club Projects-Easter!!

 For our March stamp club, we will be making these cute Easter 3-d items.  This class is a punch art class.  I thought it would be good to show how you can make so many different things just by using punches.  One is a duck attached to a plastic bag (you can put treats inside) and the second is a chocolate bunny basket!  We will rotate each month with what kind of project we make, (card, scrapbook page or 3-d item)
 I make a scrapbook page to show how you can also use the same kind of punches to create again a bunny/duck to complete a page as well.  This page will go to the hostess for the month of March!
This is the card, again using the same kind of punches to create this cute little bunny.  This card will also go to the hostess for March!

Monday, February 27, 2012

Sunflower Birthday

I am in the mood for side step cards today, just can't get enough of them.  They are so easy and fun to create with!  This card is for http://www.thepaperplayers.blogspot.com/, sketch challenge #84.  Head on over and check it out.  They have a fun sketch for you to try.  I did mine a little different.  I did however keep three objects down the middle and my sentiment at the bottom.  I would love to hear your comments on this card!

Stampin' Up Items used:
*  cardstock colors of:  rich razzleberry, very vanilla, daff. delight, early espresso
*  daisies die for the bigshot
*  bird punch for the branch
*  1/2" and the 3/4" circle punch for the center of flowers
*  pumpkin pie ink to ink the center of each daisy

Mojo Monday 230-St. Patrick's Day


Good day bloggers!  I have not played http://www.mojomonday.blogspot.com/ in a long while, so thought I would give it a shot this week.  I do not make many st. patrick's day cards, and again wanted to try something new. 

I made a side step card and decked it out in green of course!  I also used a piece from the Everyday Enchantement DSP in the Sale-a-bration Catalog.  I used the smallest heart from the heart to heart punch to make the little shamrocks and of course tied it all together with a cute little bow.

I would love to hear your comments and what you think of my creation for Mojo Monday!!

Stampin' Up Supplies used:
-  cardstock of:  garden green, whisper white, early espresso, certainly celery
-  punches of: heart to heart, bird punch for the branch
-  certainly celery 1/8" ribbon
-  Everyday Enchantement DSP
-  Teeny Tiny Wishes Stamp set

Tuesday, February 21, 2012

Hostess Wish List Holder

 I posted this creation on Stampin Connection earlier today for a contest entry.  I thought I would share it on my blog too.  I have had a few ladies wanting more details on how I made it, so the measurements are listed at the end of this blog.  I like creating holders for things such as sticky note pags and such, so I thought, why not create a nice holder for the wish lists that stampin up puts out there for us demos to use.  My plan is to give these away to each months hostess so that they can put put together and have in one location a list of the items they would like to have.  I also plan to decorate the outside using fun new items that are out now or as a preview of things to come.  This one is decorated using the enchantment dsp from the saleabration catalog, the new mixed bunch stamp set and the blossom punch that goes with it. 
This is the inside, which I hole punched 10 sheets of the list and tied them together at the top with a piece of ribbon.  I wanted to make my pen cute and match, but I did not have any of the pens that I could remove the stopper piece.

Now for the Measurements:
*  cut "Wish List" to measure 3-1/2"w x 8-1/4"L
*  cut a piece of cardstock to measure 8-1/2"L x 8"w
*  score the cardstock on the long side at 3-3/4" and 4-1/4"
*  fold on the second score line and put a tick mark along the side at 4" and 4-1/2"
(I hope that mark makes since)
*  use scissors to cut on those marks and cut to the first score line.
(this is what makes the piece that holds the pen on the inside.
*  push the cut piece to the inside
*  decorate the front as you wish
*  attach the "wish list" to the inside and tie with ribbon or brads (again use what you like)

If you don't understand something, please email me and ask, I will be glad to help!

Bird House Sticky Note Holder

 I saw this idea a while back and not sure where it came from (if you know let me know)  I did however change it up.  My version only holds the sticky notes.  I also changed mine, so that the birdhouse lid lays flat down and you can tie it shut with a bow.
 This is what it looks like up close of the birdhouse.
This is a side shot of it when the lid is down and it is tied shut with the ribbon.

Directions:
1.)  Click link to print, http://www.scribd.com/doc/82465087/Birdhouse-Sticky-Note-Holder
Birdhouse Sticky Note Holder

2.)  Click this link or the downloan button at the bottom of the instructions.
http://www.scribd.com/doc/82466143/Birdhouse-Easel-Holder-Instructions

Monday, February 20, 2012

Mixed Bunch Sticky Note Easel Holder

Good snowy day bloggers!  For the first time this winter for us, we had a wonderful day of nothing but snow yesterday!  The kids were soooo excited, they played pretty much all day in it!  We then enjoyed some hot cocoa and homemade veggie soup for dinner.  I hid in my warm craft room!! 

If you guys remember, last year I made for http://www.thepaperplayers.blogspot.com/ an apple easel sticky note pad holder (I won too for it!!)  Anyway, I had someone ask me for the directions on how I made it.  (if you would like it, I can email it to ya, just let me know)  I decided to make a new version for my next stamp club.  Remember, I made two projects to give away.  The projects are the opposit of what we are making.  This month it is a card, so the projects to give away is a scrapbook page and a 3-d project, which is this.  These items go to the hostess for that month!  They really enjoy the extra surprise items to take home.

I made this one using the following:

*  Stampin' Up mixed bunch stamp set (from the new mini catalog of course)
*  blossom punch
*  cardstock colors of:  island indigo, blushing bride
*  riding hood red ink
*  Twitterpated DSP
*  pear pizzazz seam binding ribbon
*  modern label punch, word window punch, 3/4" and 1" circle punch

Wednesday, February 15, 2012

Nail Polish Kit Caddy Paper Players #82

 Ok, next Saturday, a group of us ladies are getting together for a fun all day craft/scrapbook/card making day!  One of the ladies who will be there, is my BFF "Heather", I wanted to make a little something special for her.  I did see this idea somewhere, but if I remember, you had to pay for the instructions and I figured I could come up with my own instructions.  I will share them with you at the end of this post.  She paints her nails all pretty and stuff, so I made her this cute little nail polish kit caddy.  You can stash polish, files and lotion on either side in the box.  The really fun part is that the bottle of nail polish remover sticks up thru a hole in the center of the two boxes and acts as the support.

The colors I chose to use works with this weeks challenge over at http://www.thepaperplayers.blogspot.com/.  Head on over and check out all the details and join in on the fun.  I used poppy parade, pool party, soft suede and very vanilla.  I also used the new sale-a-bration Everyday Enchantment DSP.
 This pic shows the side view.  I of course will switch out my used bottle for a brand new one for her!!!  That would be terrible to give her a half used bottle, ha! ha!
This is a pic of the side that I used as the back.  I put a mini hand lotion and box file in it. 

Instructions:
*  you will need #2 of the #2 Box Die with your Big Shot.  Cut them out and put together as normal.
*  Cut a piece of cardstock to 3-5/8" x 11-1/4".  Score it at 4-3/4" and at 6-1/2"
*  Punch 1" circle in the center of that scored section
*  I used my 1-3/4" oval punch to punch each box on the front for an added look.  It also makes it easy to get small items in the bottom.
*  The largest layer on the front of the box measures 3-1/2" x 2-3/4".  I used the DSP for another layer and decreased the measurements by 1/4".
*  the pool party layer on each side behind the flower cluster measures 4-3/4" x 3-1/2"
*  I like to ink the edges of everything, so this is an option for you.
*  To put this all together, glue with liquid Tombo or redline tape, adhere the long soft suede cardstock to the inside of the box with the lid up.  I glued the side flaps in. (you could just cut them off)
*  After that the whole thing just sits down on top of the bottle lid slid thru the hole you punched.
*  Add ribbon around the whole thing to keep it pulled in together and decorate the outside of box as you wish.

Wednesday, February 8, 2012

Peony Flower for Paper Players #81

Ok, when I saw that the challenge for http://www.thepaperplayers.blogspot.com/ was to include some kind of flower, I knew right away what I wanted to create.  I made a bunch of these flowers last year and wound up having a slew of requests to make them for cards for Mother's Day and Birthday's. I made this one with Valentine's Day in mind.  I used the colors of basic black, pool party (oh how I love this color) and cherry cobbler.  Very vanilla inked with cherry cobbler ink is what makes up the flower.  I used the wonderful build a petal punch to create the flower, using the instructions from over at http://valitasfreshfolds.blogspot.com/.  She does an awesome job!  Hope you enjoy my take on the flower and card creation for this weeks challenge at The Paper Players, hop on over and check it out!!

Thursday, February 2, 2012

PPA128 Color Challenge-Candy Heart Book!

 Good afternoon bloggers!  I have been so busy with watching children lately, I have not had time to work on any challenges.  That's a bummer:(  Well anyway, I found a few minutes to put this cute little valentine book together for one of my favorite challenge blogs, http://www.palspaperarts.com/.  Hop on over and check out the fun and easy challenge for this week (use RED, can't get any easier than that!)  I wanted to put my matchbox die to work.  I added an extra cover to have it open like a book.  Details on measurements below if you would like to make one.  I decorated the spine of the book using the smallest label that comes with the matchbox die.
 This is a side view looking in.  I used candy hearts to fill the inside of the slide out matchbox.
This shows the inside.  I used a clear window sheet to attach to the inside to hold the candy in.  I then just used the large heart punch to punch the window shape before gluing together the cover for the slider cover.

Here's what you need and directions:

-  paper color of your choice (I used early espresso, very vanilla and cherry cobbler
-  matchbox die
-  big shot
-  large heart punch, word window punch and the modern label punch
-  tombo liquid glue or red sticky tape

measurements:
-  cut out one matchbox die (both parts) in early espresso (this holds the candy and
the outside part that it slides back into)
-  cut a piece of cherry cobbler to measure 4-1/2" x 2-7/8"
score it @ 2-1/8" and 3".  Crease and fold.  This is the outside cover of book that will open to show the inside.  I glued the back together and just the spine so it opens like a book
-  inside pages
-cherry cobbler, 1-7/8" x 2-1/2"
-  very vanilla, 1-5/8" x 2-1/4"

Tuesday, January 17, 2012

Stamp Club Valentine Card

Ok, last but not least is the demo card.  Again I used the same paper pack, stamp set and paper doily to show that all the same items can be used on three seperate projects, no matter what kind you like and prefer to make.  I threw in another sneek peek item from the Celebration catalog, can you guess what it is?!?  It is the cute little brad that's in the center of the large doily.  It comes from the Everyday Enchantment Ribbon and Brad Pack you can get for FREE, yes I said FREE, when you place a minimum order of $50 during the Feb. 24 thru Mar. 31, 2012.

Stampin' Up items used:

*  cardstock colors of:  calypso coral, very vanilla, Celebration Everyday Enchantment DSP, pool party
*  stamp set:  Take it to Heart
*  ink:  pool party and calypso coral
*  Punches:  Heart to Heart and Full Heart
*  misc. items:  paper doily, pool party ruffled ribbon, Everyday enchantment ribbon and brad pack

Stamp Club Pillow Box

This is the 3D item that I will display at my first stamp club.  I used the same "Celebration" Everyday Enchantment DSP pack to wrap around the box.  I used Lucky Limeade Ruffled ribbon to tie around the holder.  The holder is the wonderful Pillow Box die cut out with clear overhead projector sheets.  It holds 3 Hershey Nuggets perfectly.  I tied on a tag using the scalloped circle punch and added a few mini hearts from the Heart to Heart punch.

Valentine Scrapbook Page

I have put together my first "Stamp Club" and I am very excited to get started!  My plans are to create either a scrapbook page, a 3D item or a card.  First our first club get together we are making a valentine scrapbook page.  As you can see we are using a few new items from the Occasions Mini Catalog.  The DSP is a sneek peek from the Celebration Catalog. 

With my stamp club I know that there are people who like to maybe only do scrapbooking, card making or 3D items.  So to make my stamp club a little different and fun, I want to make 2 other items besides the item we are making for the project to demonstrate how you can use the same products, but on three different projects.

For example:
Our first project is a scrapbook page.  I will have on display the card and 3D so that you can see the versatility.

Stampin' Up Products used for this page:

*  cardstock colors of:  riding hood red, very vanilla and pool party
*  Celebration Catalog:  Everyday Enchantment DSP
*  ink colors of:  riding hood red, soft suede
*  punches used:  heart to heart, full heart
*  stamp sets:  Take It to Heart
*  Misc. Items:  Paper Doily Lrg. Sizzlits Die, Pool Party Ruffled ribbon

Tuesday, January 10, 2012

Desktop Calendar

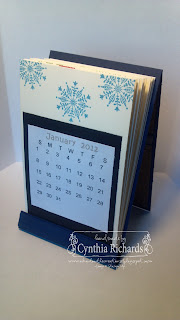
 In the kitchen on my bar countertop, I like to keep a small calendar for quick references.  I saw this calendar and thought it was perfect.  I liked how it was different from the one I made for 2011 and that it had a seperate page for each month.
 This shows how each page is seperate.  After each month is over, you can simple tear out that month and the new month is on top, or to see ahead, you can just flip to that month.  I decorated each month with a special stamp that goes with that month and its holiday or event.
This is the front (nice and simple).  You could use it and keep it in your pocketbook.  Its a wallet size.  The tutorial was done differently than how I made mine.  I added a scored strip of cardstock to back to make an easle for extra support for when it stands up.  If you don't, the weight of the calendar pages make it want to flip forward.

Monday, January 9, 2012

A Little Wall Art

I have been wanting to recreate the scattered flowers you see in the front of the full catalog.  So last week I did it!  I several colors from each color family and punched out flowers/petals from the Build a Blossom punch and the new Blossom punch from the new occasions mini.  I centered each with a flat white push pin and pinned them to the wall around the definition of "CREATE".  I used my Cricut and black vinyl sheets to cut out all letters to finish the definition.  I love how it turned out.  Leave me feedback, so I can hear what your thoughts are!