Showing posts with label Halloween. Show all posts

Saturday, August 29, 2015

Day 4 Halloween ~ Holiday Catalog Countdown


Good Afternoon Happy Stampers!!  Cynthia here and I'm back for another fun day of projects.
Today is the second day of our 2015 Holiday Catalog Countdown with the designers at Stylin' Stampin' INKspiration!
 
We are SO excited to be bringing you another fabulous NEW catalog countdown!!
 
As you know, Stampin' UP! is releasing the 2015 Holiday Catalog on September 1st. HOW EXCITING IS THAT!!
 
For this countdown we are going to take a seasonal approach to help get you in the holiday spirit!
 
How fun is that!?!
 
Today's Seasonal Holiday Focus is ~ Halloween


Supplies Used
Cardstock ~ tangelo twist, very vanilla
DSP ~ happy hauntings DSP
Ink ~ basic black, tangelo twist
Stamp set ~ sweet hauntings
Misc. ~ hodgepodge star clip, banner punch, circle framelit set, happy haunting washi tape


Friday, October 31, 2014

Happy Halloween Freaky Friends!!!

 
Happy Halloween and thanks for stopping by!  Today over at Stylin' Stampin' INKspiration, we are celebrating Halloween!  Some design team members may have tricks and some may have treats!  May sure you stop by to visit each to see which they have!
 
Today my project is a treat!  I made these cute little twisted cards, perfect for sliding a gift card or some cash inside.  I have two boys who love I-Tunes for their music and games.  Therefore they each will be getting an I-Tunes gift card in their pocket with a burlap treat bag filled with some candy treats (courteous of My Paper Pumpkin September kit!)


Supplies Used
Cardstock ~ basic black, whisper white, Bermuda bay, tangerine tango
Ink ~ basic black, tangerine tango, Bermuda bay
Stamp set ~ freaky friends, ghoulish greetings
DSP ~ motley monsters
Misc. apothecary accents framelit set, crushed curry bakers twine, wiggle eyes (retired), decorative label punch

Sunday, October 26, 2014

Halloween Challenge CYCI#42

Thanks for joining me here today at Ink a Doodle Creations.  Today I am over at Can You Case It? and this weeks challenge is a Halloween one!  Did I say, I love Halloween?  Its such a fun holiday and its the one day I eat as much chocolate and candy as I want, and don't feel bad!!
 
 
This fun little spooky card was created using the inky block technique.  I also went with a different sized card.  I cut out my rectangle shapes, rounded the corners and inked up my blocks, spritzed with a little bit of water and stamped it on.  I used colors of tangerine tango, old olive and rich razzleberry.  Directions for this card are below.
 
 
On the inside, I inked up a layer and added a bat.
 
Directions:
card base is a 6-1/2" square.  I scored it at 3-1/4" and folded.
Inked layers measure: 1-3/4" x 2-1/4" with corners rounded.
 
Supplies Used
Cardstock ~ very vanilla, old olive
Ink ~ tangerine tango, old olive, rich razzleberry, basic black
Stamp set ~ freaky monsters, good greetings
Misc. ~ brights candy dots, black bakers twine
 

Friday, October 17, 2014

Let's Get Spooky with #PCCCS114

Good morning and thanks for joining me here at Ink a Doodle Creations!  I am officially in the mood for Halloween.  I decorated the house Wednesday night and I just need candy!!! TRICK OR TREAT!!!

Today I am sharing my project card for the challenge over at Paper Craft Crew.  The sketch was perfect for my idea of ghosts and goblins and even Halloween needs a little sparkle!!

 
Supplies Used
Cardstock ~ basic black, whisper white, Bermuda bay
Ink ~ sahara sand, Bermuda bay
Stamp sets ~ fall fest, ghoulish greetings
DSP ~ motley monsters
Misc. ~ on film framelit set, silver glitter paper, tangerine tango two tone twine, banner punch, neutral candy dots, star framelit set, itty bitty accents punch set (the star)
 
Again, thanks for stopping by.  Leave some "love" as I always enjoy reading your kind comments.  Don't forget to stop back by next week to see my 2nd Family Christmas card idea choice!

Tuesday, October 14, 2014

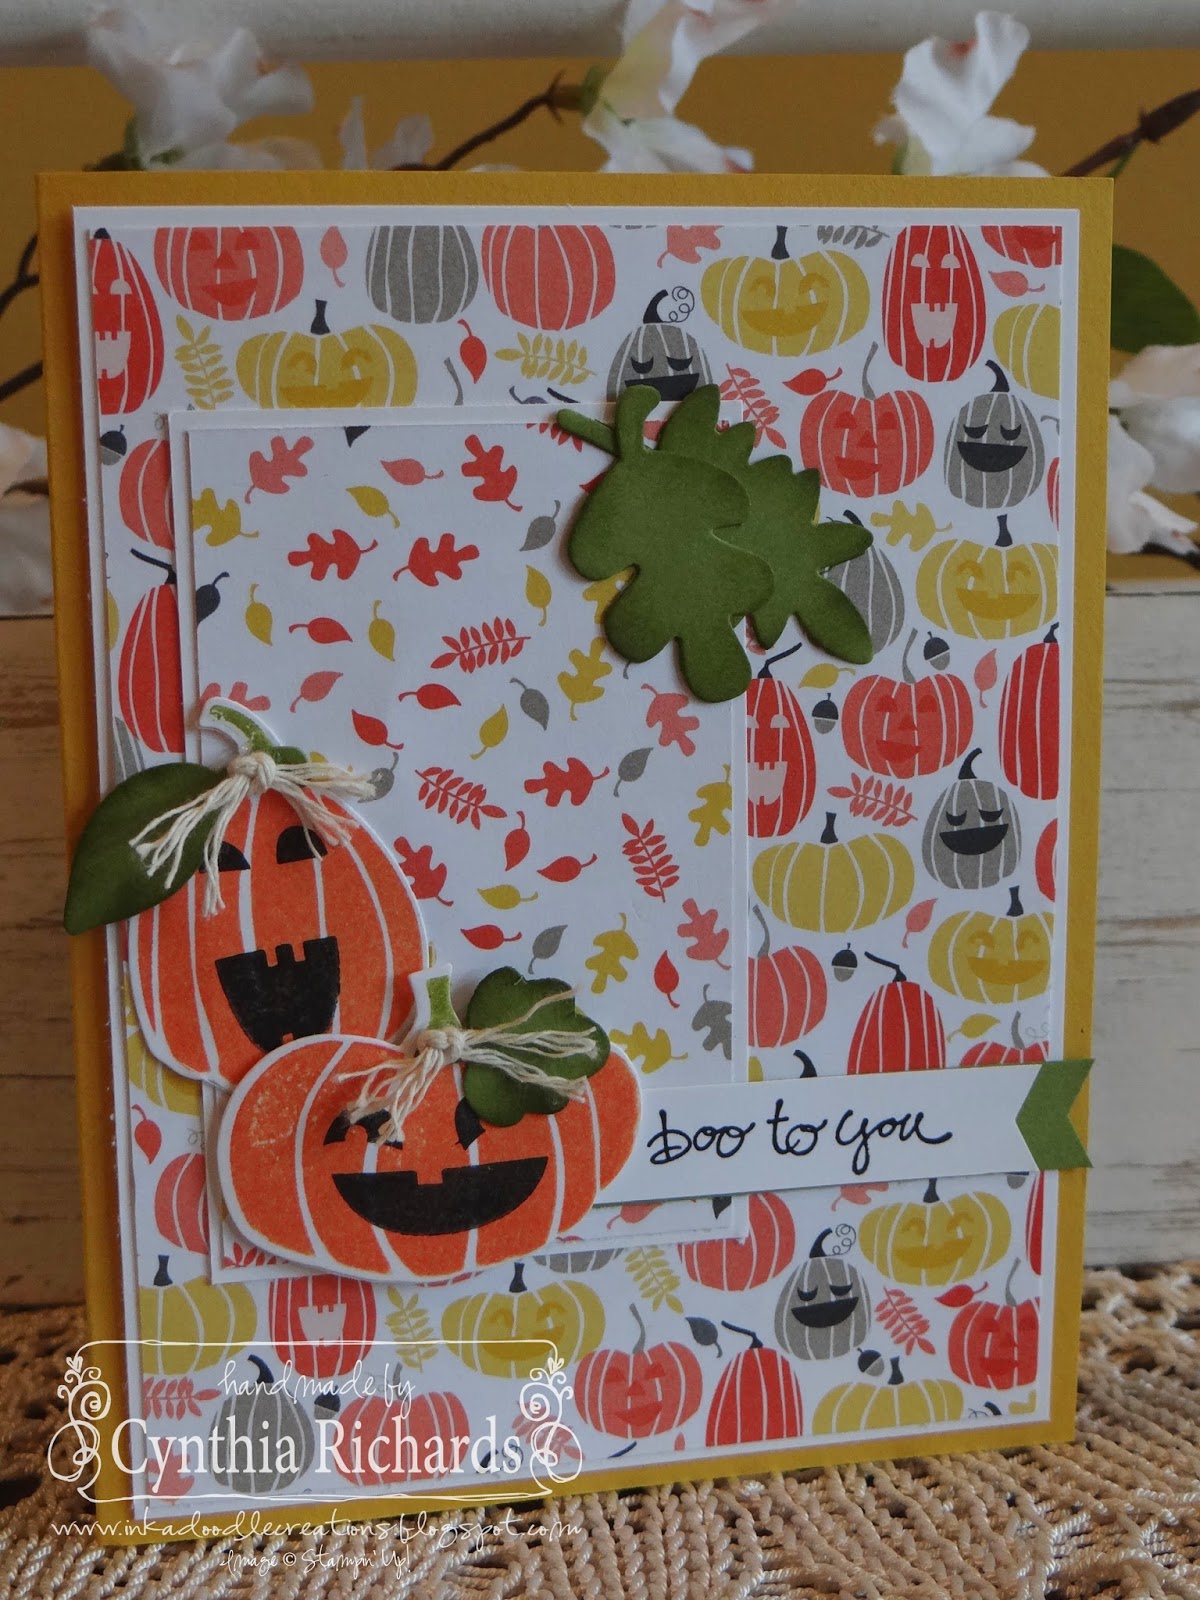
Boo To You! PCCCS#113

Good evenings and thanks for stopping by here at Ink a Doodle Creations.  After getting in a quick two mile run during my kids nap time, I had some time to get in a little fun stamping stamp!  I wanted to play along with the fun sketch over at The Paper Craft Crew, but boy am I cutting it close.  Its due this evening!  YIKES!!!

I thought this sketch was perfect for some little pumpkins using the Fall Fest stamp set and the Motley Monsters DSP.  Perfect together I think, don't you?!

 
I love how the shredded twine just finishes these little pumpkins quite nicely!  And the "Boo to you" sentiment, well its perfect as well as all the other many quick sentiments you get from the Good Greetings stamp set.  Yours FREE when you host at least a $300 show or place your own order!!!
 
Paper Craft Crew Card Sketch #113
 
Supplies Used
 Cardstock ~ crushed curry and whisper white, old olive
Ink ~ tangerine tango, basic black, old olive
DSP ~ motley monsters
Stamp set ~ fall fest, good greetings
Misc. ~ old olive two tone twine, fun fall framelit set (its a bundle with the fall fest stamp set and you can save 15% off when you purchase the bundle!), banner punch


Thursday, October 9, 2014

Pumpkins! Pumpkins! Pumpkins! SSINK October BLOG HOP

 
Good morning, happy Thursday!  Thanks for stopping by to visit me here at Ink a Doodle Creations.  Today over at Stylin' Stampin' INKspiration, we are having our October BLOG HOP and we are sharing all things "Pumpkins"!!!  I don't know about you, but I love everything pumpkin related, edible or not!...buttttt I do prefer edible!!
 
As you hop along, please be sure to comment and show some love on every blog! We are always excited to hear from our followers! You should have just left stop number #1 on the Stylin' Stampin' INKspiration Blog Hop -Jennifer at Happy 2 Scrap 4 Life . If so, you are in the right spot. If a link doesn't work or you get off track, you will find the full blog hop lineup below.
 
 
So my special pumpkin project is this little basket that I traced from a template and decorated to turn into a pumpkin complete with a stem and leaves.  This little basket is cute and petite, but will hold a lovely sized treat! 

 
This cute little pumpkin basket is filled with caramel candy corn.  Perfect little treat!

 
The topper is three leaves from the Autumn Accents big shot die.  I embossed them using the wood grain folder.  The stem is a rolled up piece of burlap ribbon.  I tied on a wooden accent leaf with baked brown sugar thick twine for the bow and its what also ties it onto the treat bag.
 

http://stampinfunwithdiana.blogspot.com/2014/10/stylin-stampin-inkspiration-october.html
 
I hope you have enjoyed my cute little pumpkin basket.  Head on over to stop #3 Diana at Stampin' Fun with Diana.  I just know you are gonna love what she created!
 
Blog Hop Participant List:
  1. Jennifer at Happy 2 Scrap 4 Life
  2. Cynthia at Ink-A-Doodle Creations  --------->You are HERE!
  3. Diana at Stampin' Fun with Diana
  4. Donna at Organized Chaos
  5. Darcy at Dj's Stampin' Place
  6. Erica at Stamping Starlette
  7. Tonya at Stamp with Tonya
  8. Bree at Craft-Somnia Momma
  9. Kim at Stamping with Kim

Friday, October 3, 2014

Halloween Envelope Punch Board Treat Bag with Tutorial!

 
Good morning, its Friday, Friday, Friday!  Yesterday I sharing my Halloween card created using the Bootiful Occasions stamp set.  Today over at Stylin' Stampin' INKspiration, I am sharing this cute little candy box I made using the envelope punch board and some simple scoring.

 
I love being able to create my own little candy treat holders.  I love even better when I can use tools that I already own to make it easier.  That's where the handy dandy envelope punch board comes in hand.  With some simple score lines to get the box, I added a couple quick punches with the board to make it easier to close up.  Plus its just cute and who doesn't love ca-ute!!  The tag is created using the new note tag punch, freaky friends stamp set and a couple cute banners, then tied on using the new tangerine tango two tone rope twine.

 
Even though this is a small treat holder, don't under  estimate how much candy you can fit inside.  This little treat bag is perfect for simple teacher favors, to give to your child's school friends or co-works.  Whats even better, is that it doesn't take much paper and its a great way to use up that DSP stash.  YES, we know you have one!!!
 
Would you like to create your own now?  Follow these simple instructions and get started.
Above supplies you will need. Use choice of cardstock or DSP and cut to 8-1/2" x 5"

Score one the long side at 1/2", 2", 4-1/2", 6"

score on the short size at 1"

cut the tabs along the bottom up to the 1" score line and remove the smallest tab on the right.  these tabs folded up create the bottom of the box.

fold the 1/2" tab over and line up at the 1" line using the envelope board and then punch.

fold the paper on the next score line and once again line up with the 1" line and punch. 

you will fold on each line and punch until your paper looks like the above picture.

I would suggest using either redline or fast fuse adhesive to hold your box together depending on what kind of candy or item you would like to place inside.  place adhesive along the 1/2" tab as shown.

flip cardstock over and place another piece of adhesive along the third tab to close the box bottom together once folded in.

once you have folded up box this is what you end up with.  If you wish to stamp on the box, I would do so before closing it up.
 
 
Supplies Used
Cardstock ~ basic black, whisper white
Ink ~ Bermuda bay, basic black, tangerine tango, crushed curry (markers)
Stamp sets ~ freaky friends, ghoulish greetings
DSP ~  motley monsters
Misc. ~ note tag punch, tangerine tango two tone rope twine, Bermuda bay bakers twine, basic rhinestones, banner punch

Thursday, October 2, 2014

Halloween Boots and Banners

 
I can not believe that 2014 has went by so fast that it's October and time to start thinking of Halloween.  Next thing you know, I will begin thinking of _ hri_ _ m_ s!  Nope I'm not ready and I'm not even gonna say let alone type it out!  I need my chocolate and turkey fix before that time is here!!
 
Today over at Stylin' Stampin' INKspiration, we are sharing some Halloween project ideas.  This past weekend I was lucky enough to spend three whole days and part of Thursday evening at a special weekend retreat I attend 2-3 times a year.  I was able to complete 28 scrapbook pages, my October club demo projects and a few upcoming projects for the SSINK design team.  This is the card I was able to complete.
 
 
Forever I have been wanting to order the Bootiful Occasion stamp set and forever I have been putting it off.  Well I can happily say "no more".  I finally purchased it and put it to use.  The witches boot is one of my favorites from it.  (stay tuned this week, as I will be sharing another one of my favorite boots from this set).  I created the base of my card so that it opens from the center.  Cut out some fun shapes using my framelites, stamped on the boot and did some simple coloring with my markers.  I cut out three different banners and stapled them to the front of my card.


On the inside, I also added three banners, making sure to leave lots or room for that hand written message.
 
Supplies Used
Cardstock ~ basic black, whisper white, tangerine tango
Ink ~ Bermuda bay, tangerine tango, crushed curry
Stamp set ~ Bootfiul Occasion
DSP ~ motley monsters
Misc. ~ banner punch, labels framelit set, circle framelit set, mini stapler
 
I hope you have enjoyed my Halloween card.  Leave some "love" and go check out what the other design team members have create!

Thursday, September 25, 2014

Tag Punch Mini Album and Tutorial

Good morning!  Today I am over at Stylin' Stampin' INKspiration sharing a cute mini photo album, along with the tutorial on how to recreate it.  You won't get the instructions here.  Click the SSINK link above to head on over to our main design team blog to get all the details!!

Monday, September 15, 2014

EEEKKK!!! #SSINKSS13 September Layout Challenge!

 
Good Monday morning, time for another fun and this time simple sketch layout challenge here with Stylin' Stampin' INKspiration.  We hope you will come play along with us.  So what are we waiting on, lets get started.  Below is our sketch layout.  Make it your own and link up your finished page thru our main blog post (click above link) or join our Facebook group and link it to the challenge post for today!  Either way, we just want to see you having fun and creating!!
 
I'll have to be honest and say that I don't have any Halloween pictures that need to be scrapbooked right now.  I guess you could say "I'm caught up)  But I thought I'd go ahead and create a fun and quick one ready for pictures for this coming Halloween.  Loving how quick MDS can make it for me when I'm in a hurry and don't have time to pull out all my hand held toys.

 
So now you've seen mine, let me see yours (challenge page that is----get your mind out of the gutter!!)  TEE-HEE!!
 
Supplies Used
My Digital Studios software
Howlstooth & Scaringbones DSP, Spooky Bingo Bits Brush Set

Friday, September 12, 2014

Merry Everything Bundle Fun!

 
Good Friday morning!  Today over at Stylin' Stampin' INKspiration we are sharing projects created with bundles!  What I mean by bundles is that in the current full catalog and the holiday mini, there are certain stamp sets that are paired with a punch.  You can purchase them either separately or bundled together and save 15% off the price.  Who doesn't want to save money! 
 
So for my bundle project I decided to create with the "Merry Everything" bundle.  It comes with a stamp set that has different tags for different holidays and occasion and a tag shaped punch.  Of course, I love Halloween, so I had to pick the cute little "Good to the Last Bite" stamp. 

 
The fun part was writing out my candy list on the typeset DSP.  The cute buttons have simple black and white twine running thru each and the large dots are sponged in white craft ink.
 
Supplies Used
 Thanks for stopping by.  Don't forget to leave some "love" and head on over to see what our other design team members have used.
 

Tuesday, September 9, 2014

Just Bite Me!! PCCCS108

Well I would say good morning like normal, but for todays challenge project, its a good evening.  Its totally throwing me off!  Today I wanted to play along with the fun sketch over at The Paper Craft Crew.  I thought I had until tomorrow to get it done, but I looked at the date wrong and well that it explains why I'm posting at 2:19pm.

Here is the sketch...
Paper Craft Crew Card Sketch #108 for September 3, 2014. #stampinup #cardchallenge #papercraftcrew

and here is my take on it...


Last year Stampin' Up! released an awesome Halloween Photopolymer stamp set called, "Bite Me".  Its one of my favorites as I am a Halloween gal and couldn't wait for the right challenge to come along so I could use it. 

My base is Crumb cake with an embossed layer with the larger polka dots folder.  I cut a strip and two 1-1/4" squares in crushed curry and sponged with in tangelo twist ink.  I made sure that when I stamped in web, it went over top the two squares for a little drama affect.  Turned out pretty cool!  I added three crushed curry candy dots to the top right corner and finished it off with a "happy Halloween" banner across the two layered squares.
 
Supplies Used
Cardstock ~ crumb cake, very vanilla, crushed curry, basic black
Ink ~ basic black, tangelo twist
Stamp set ~ Bite Me
Misc. ~ regal candy dots, polka dots folder, banner punch

I hope you have enjoyed my take on the sketch challenge.  Leave some "love", as I always enjoy reading your comments.  It motivates me to keep creating and having fun!