Showing posts with label Baby/Kids. Show all posts

Friday, July 31, 2015

Welcome Baby #FM219

Good Friday morning!  Thanks for stopping by.  Today I am over at The Friday Mashup where Tara has a fun new challenge for us this week!  We can't wait to see what you create and WOW us with!

 
Here's your Mashup Challenge this week:
  • Create a project using the colors "Pink, Grey & Sky".
  • Create a "Square shaped card".
  • or Mash it Up and created  a "Square shaped card using the above colors".

 
So seeing these soft color pallet made me think "baby".  One of the stamp sets I own but don't play around with much is the Something For Baby.  Its a fun stamp set with all the baby themed accessories.  One of my favorites is the onsie.  I stamped it in soft sky and added some twisted ribbon behind it and paired it with some retired pink washi tape and embossed my white later in the stars embossing folder and rubbed on some soft sky ink to help them stand out.
 
Supplies Used
Cardstock ~ whisper white, smoky slate
Ink ~ smoky slate, soft sky
Stamp set ~ Something for Baby, And many more
Misc. ~ subtle and neutral candy dots, soft sky ribbon, misc. washi tape, star embossing folder
 
I hope you have enjoyed my challenge card this week.  Leave some "love" and go see what the other designers created!!

Friday, April 17, 2015

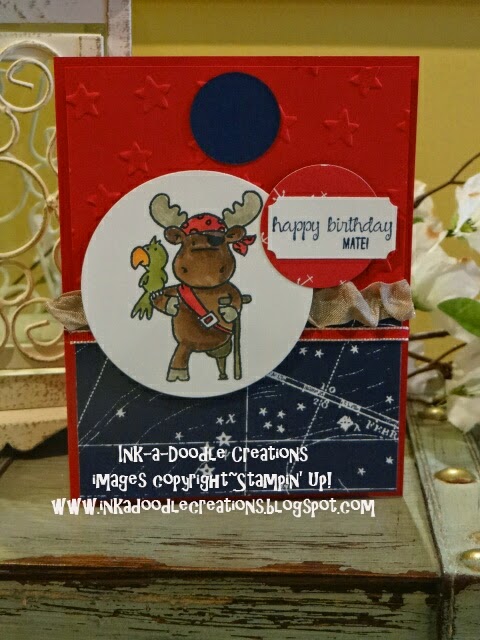
Happy Birthday Mate! #FM205

Good Friday morning!  Today I am over at The Friday Mashup and Tara has a fun challenge for us.  So Grab that cup of coffee and enjoy my challenge card, get inspired by the designers and go get creative! 
 
This week's Mashup! Challenge:
  • Create a project using "the sketch".
  • Create a project using the "Bouncing Brayer Technique (tutorial)". 
  • or Mash it Up! and create a project using the Bouncing Brayer Technique and the Sketch".  
 
I decided to stick to the sketch only with my challenge card and turn it into a fun kids birthday card.  I was given this cute little moose pirate stamp by a friend and I hadn't used it yet, so I pulled it and went to work.  I paired it with the maritime DSP and added some fun circles and ribbon. 
 
Supplies Used
Cardstock ~ real red, night of navy and whisper white
Ink ~ night of navy, old olive, pumpkin pie, cherry cobbler, early espresso, soft suede and crumb cake
Stamp ~ misc. moose pirate, and many more (su!)
DSP ~ maritime
Misc. ~ crumb cake seam binding ribbon, real red taffeta ribbon, ticket punch, circle framelit set, star embossing folder
 
Thanks again for stopping by to check out my challenge card for The Friday Mashup.  Leave some "love" and go see what the other designers created!  I hope you have a wonderful sunshine filled weekend!

Wednesday, April 15, 2015

Silly Monster Eyes!!!


Good morning!  Today I am over at Stylin' Stampin' INKspiration and we are sharing projects created for "kids".   Click the link, head on over and see what the other designers created too!

 
So I wanted to create something funny for my kids birthday card.  I used the circle card framelit set and cut one out in rich razzleberry with each side having a layer that I embossed with the little dots folder.  I layered some circles with pool party and very vanilla for the eyes. 

 
On the inside I stamped "Make a Wish" with the perfect pennants stamp set.
 
Supplies Used
Cardstock ~ rich razzleberry, very vanilla, pool party, basic gray, crisp cantaloupe
Ink ~ rich razzleberry
Stamp set ~ perfect pennants
Misc. ~ circle framelit set, circle card framelit, tiny dotted embossing folder, small oval punch for tongue


Friday, March 20, 2015

#HappyBirthday FM201

Good Friday morning, this morning I am off and headed to Va. Beach to run in the Shamrock Half Marathon on Sunday and participate in the Dolphin challenge, which includes a 8K on Saturday morning.  Wish me luck!  But before I leave I want to share my challenge card for our challenge at The Friday Mashup!  Amy has a great color challenge for us.
 
 
This Week's Mash Up! Challenge: 
  • Create a project using Rich Razzleberry, Smoky Slate & Pacific Point. 
  • Create a project with a "See-thru element (window, acetate, vellum). 
  • or Mash it Up! and create a project "using the colors above and a see thru element". 

 
I recently purchase a new stamp set "friend request" and cell phone die cut set from a company that I like to buy from.  This was such a fun card to create.  Totally grungy and perfect for a teenager.  Just buy changing the colors, this could be for girl or boy!  I added a clear window sheet under the top layer of the phone and added some shaker elements.
 
Supplies Used
Cardstock ~ whisper white, pacific point, rich razzleberry, smoky slate
Ink ~ basic black, pacific point, smoky slate, rich razzleberry
Stamp sets ~ gorgeous grunge, off the grid (SU!), friend request (MFT)
Misc. ~ sequins, cell phone die cut set, clear window sheet
 
I hope you have enjoyed my card for this weeks Friday Mashup challenge.  Click the link above to head on over to our main site for all details and the link up your creation.

Wednesday, March 4, 2015

Baby Clay Buttons

 
Good Wednesday morning!  Today I am over at SSINKspiration and we are sharing projects that somewhere on it use Stampin' Up!'s simply pressed clay. 
 
 
I hadn't used or played around with mine in a while, and had forgotten how fun it is to create fun buttons, flowers or really anything that your imagination lets you.  For todays project I created a cute little simple baby card and created one each of the three buttons using the Clay Molds.  After they had dried really good, I used my stampin' write markers of hello honey, crisp cantaloupe and pistachio pudding to color each one and attached them with a simple glue dot.
 
Thanks for stopping by, head on over to see what a couple of the others created using the clay.
 
Supplies Used
Built for Free Using: My Stampin Blog


Friday, February 20, 2015

Dropping in for Your Birthday #FM198 Challenge

Good Friday morning everyone!  Today I am over at The Friday Mashup where Lisa has come up with a fun mashup challenge for us this week.  I hope you will enjoy my challenge card and decide to come play along with us.
 
 
This week's Mashup Challenge:
  • Create a project using the "Sketch". 
  • Create a project with anything "Flight Themed (hot air balloon, plane, kite, etc)"
  • or Mash it Up! and create a project "using the sketch and anything flight themed".

 
One of the things I enjoy creating are cute kids cards, but just don't do it often.  As soon as I saw the theme of "take flight" I new right away what stamp set I wanted to play around with.  The Boys will be Boys stamp set is perfect for any little boy.
 
I hope you have enjoyed my challenge card, leave some "love" and go see what the other designers created!
 
Supplies Used
Built for Free Using: My Stampin Blog


Sunday, February 1, 2015

For the New Baby CYCI#55

Good morning!  Well at this moment, I sitting in the airport waiting to load the place to head back home.  Not looking forward to that, after having an amazing time in Florida at Stampin' Up's! Leadership training and getting to visit with my friend Breelin.  Until July when we get to do it all over again at convention!!  Today I am over at Can You Case It? and its time for a new sketch challenge.  I hope you will get creative and join us!  I can't wait to see what you create!


I decided to pull out a stamp set I hadn't played with in a while, Zoo Babies!  Its such a fun and cute set that can be great for baby boy/girl or just by simply changing the color palette, you can create a card for an older child as well!
 
Supplies Used
Cardstock ~ crisp cantaloupe, whisper white, baked brown sugar
Ink ~ crisp cantaloupe, hello honey, pistachio pudding
Stamp set ~ zoo babies
DSP ~ lullaby
Misc. ~ crisp cantaloupe twine, word window punch, star embossing folder

Friday, January 23, 2015

Hello Sweet Baby! FM194

Good morning its Friday, Friday, Friday and today I'm over at The Friday Mashup!  Today we have an all new challenge.  Create a project using colors inspired by the below photo (tangerine, aqua and white) or a Baby theme, or you can mash it up and use both. 


Well I decided to stick the "baby" theme and came up with this.  I just love the lullaby DSP pack and it works perfect for boy or girl.  I even decided to pull out my sewing machine and do some simple sticking along the edges to add some texture.  I created this cute little vellum mini envelope and added some fun sequins inside to giggle and wiggle!  I added some twine and a few candy dots to tie it all together with some fun embellishments.
 
Supplies Used
Cardstock ~ crisp cantaloupe, whisper white, baked brown sugar
Ink ~ baked brown sugar
DSP ~ lullaby
Stamp set ~ baby we've grown
Misc. ~ hello you thinlit set
 
Again thanks for stopping by, leave me some "love" and head on over to catch all the details on how you can join us in our challenge.  Don't forget to go visit our other designers to see what they created!

Monday, December 8, 2014

Welcome Baby #SSINKCS16

 
Good Monday morning!  I hope everyone had a wonderful weekend.  Today I'm over at Stylin' Stampin' INKspiration and its time for an all new card sketch challenge!  We do hope you will get INKspired by our designers to come join us!

 
Here is our fun sketch created by Breelin Renwick.  She is so talented with creating our sketches!

 
One of the parents, that I babysit for is expecting their second child in about a month and well I needed a baby card to welcome "him" here.  The "and many more" stamp set worked perfect for the sentiment banners I created.  I just love the "B" as the main focal point.  I tied on some baked brown sugar and gold bakers twine to help accent it.

 
Supplies Used
 Cardstock ~ coastal cabana, hello honey, baked brown sugar
Ink ~ baked brown sugar
Stamp set ~ And Many More
DSP ~ Lullaby
Misc. ~ banner punch, basic bling, coastal cabana blendabilities, baked brown sugar twine, gold bakers twine
 
Don't forget to go checkout the other designers and their INKspiring takes on this sketch!

Sunday, November 30, 2014

Blinged out Sheriff - #CYCI47

Good morning!  Thanks for joining me here at Ink a Doodle Creations. Today I am over at Can You Case It? and we are ready to start this week off with a fresh new sketch challenge.  I hope everyone survived all the turkey eatin' and black Friday shopping.  Don't know about you, but boy, I need a nap!!  Shopping and getting all those good deals is tiring!  I hope you will come create and except our sketch challenge!  We can't wait to see what you come up with!
Well since I couldn't narrow it down and decide on which stamp set to use for this sketch, I went to my friend Breelin Renwick at Craft-somnia Momma and asked her to pick for me.  She selected for me the Yee-Haw stamp set.  The last time I used this set, I created a card geared for a boy.  This time I switched it around and am using this sketch for a girl and not just any girl, but a "Blinged out Sheriff" girl!!
 
 
I used my calypso coral blendabilities to color the sheriff's badge and layered with some twirled twine.  I also layered several ribbons and topped it with some gold sequin trim.  I added a very vintage button with some gold bakers twine to tie it all together and add that special "girl" touch.
 
Supplies Used
Cardstock ~ calypso coral, baked brown sugar and very vanilla
Ink ~ momento ink, early espresso, baked brown sugar, gold encore
Stamp set ~ Yee-Haw, hardwood
Misc. ~ very vintage buttons, gold sequin trim, natural twine, gold bakers twine, gold glimmer paper, mini star punch, large polka dot embossing folder


Wednesday, November 19, 2014

A Buckaroo Birthday FM186

Good morning!  Thanks for stopping by to visit me here at Ink a Doodle Creations.  This week has been going by so fast that I almost forgot to post about my challenge card for the Design Team call over at Friday Mashup!  Wish me luck!!

Here is the sketch that we were to play along with.  The mashup part was to add a special element that you might not normally see.  Well even though, a clothespin is not that un-normal, its still always a favorite of mine to add to a card, so I ran with it!!  Well, I didn't actually run with it, but I did clip it on!!!  That there, was a little Hump Day humor!!


And here is my take on the sketch.  One of the fun stamp sets I just love is the Yee-Haw Photopolymer set.  Can you believe its my first time to crack it open?!  I know, its sad really!:(  But I can say, I had a lot of fun with it, so much that I plan to play with it later today for another project card.
 
I used the Hardwood background stamp and water colored it with pool party ink.  I added a side layer of hello honey for my burlap strips to go on.  I love working with burlap, its so fun and it was perfect for a cowboy type card. 
 
As you can see with the Sheriff's badge, I also water colored it in hello honey and pool party.  I added some looped gold bakers twine behind it and tied a on a small piece to the clothespin.  I stuck it on tight with a couple foam dots to make it POP!!! 


Supplies Used
Cardstock ~ basic gray, whisper white, hello honey
Ink ~ basic gray, hello honey, pool party
Stamp set ~ hardwood and yee-haw
Misc. ~ burlap ribbon, gold bakers twine, foam dots, distressing tool
 
I hope you have enjoyed by challenge/design team call card.  Wish me luck!!


Monday, June 2, 2014

Sweet Baby June Color Challenge at SSInk!!

 
Good morning!  Its the first Monday of June and you know what that means?  Its time for another fun color challenge over at Stylin' Stampin' INKspiration.  I hope you will enjoy our projects and decide to come play along with us!  We always love seeing what others create.
 
 
Well I am slowly starting to break out and use some of my new toys from the 2014 Stampin' Up! catalog!!  I've been putting it off, cause I knew that once I started, I wouldn't be able to stop!!  One of the new fun items I got to preorder as a Demo, was the new "Something for Baby" stamp set and its matching framelit set.  So of course I turned our color challenge into a cute baby card.
 
I used the colors of daffodil delight, blushing bride and soft suede and punched out two different circle shapes and scattered them around on my base layer.  The fun part came in with stamping the onsie and added the cute little tie.  It is raised up using a foam dot.  I just love the added lace trim ribbon across the stamped quilted arrow shape created from the Oh, Hello stamp set (retiring).

 
On the inside, I stamped across the bottom the matching stamped quilted arrows and added a couple punched circles, leaving plenty of room for a hand written message.
 
Thanks for stopping by.  I hope I have INKspired you to come create and join us with our color challenge for June!
 
Supplies Used
Cardstock ~ soft suede, daffodil delight, blushing bride, whisper white
Ink ~ soft suede, daffodil delight, blushing bride
Stamp Sets ~ Oh, Hello (retiring), Something for Baby, Itty Bitty Banners
Misc. ~ 1/2" and 3/4" circle punches, bitty banner framelit set, something for baby framelit set, neutral candy dots
Ribbon ~ lace trim (retiring), natural chevron ribbon
 
All these items and more can be purchased HERE!

Tuesday, May 6, 2014

Lets Get Movin' at Stylin' Stampin' INKspiration

 
Good morning and thanks for joining me here from Stylin' Stampin' INKspiration!  Today we are sharing projects made using the "pull tab slider" technique.  For basic instructions you can find them here on Splitcoaststampers.  I went a step further with my card and created a horizontal center step card for my base with the pull tab slider moving across the bottom.

 
I wanted to use the You're My Hero stamp set one more time before it leaves us, cry...cry!!  It is such a great stamp set to use for "boys" of all ages!  I used the retro fresh DSP on the side panels layered with some tangerine tango.  For the center panel, I stamped the fire truck in so saffron and coastal cabana.  I also added the film strip from the On, Film framelit set and added a simple banner that says "Happy Birthday". 

 
The fire truck is stamped and colored in tangerine tango, with three basic gray candy dots added to the wheels.  As you pull the tab the truck slides along the road as if its actually driving.  Behind the truck, you then see the stamped words, "weeeooo-weeeooo".

 
I hope you have enjoyed my take on the pull tab slider card technique and you are going to go right now and give it a try yourself!  Don't forget to leave some "love" here, and then go check out what the other design team members have created using this fun technique!  We hope we will INKspire you to go make one too!
 
Supplies Used
Cardstock ~ baked brown sugar, very vanilla, tangerine tango, basic black, coastal cabana
Ink ~ tangerine tango, so saffron and coastal cabana
Stamp set ~ You're my Hero
DSP ~ Retro Fresh
Misc. ~ on film framelits, mini banner punch, neutral candy dots, word window punch

Wednesday, April 30, 2014

For Baby! DD #100

Good morning!  Its hump day and we are half way thru the week!  Today's card is for the final color challenge over at The Dynamic Duo's.   When I saw the colors, I immediately thought "Baby"!  I love the softness of so saffron and pool party together. The layout for my card came from a sketch I found on Pinterest.  It worked perfect since I wanted to keep this card simple with layers and details.
Card sketch...ideal for this "paper scraps can't be thrown away kind of a gal".... :o)
 
So here is what I came up with.  I started with a base color of smoky slate and layered with a 5" x 3-3/4" piece of white.  I am known for not throwing away anything.  Especially when it comes to DSP scraps.  I keep all my small pieces inside the pack for future uses.  This came in handy with this card.  I had some 1/2" strips left over from a previous project.  All I had to do was cut them down to the lengths I needed for this card to have them stagger.  The so saffron strips came from the I Am Me DSP pack.  The other strips are just solid pool party strips.  I stamped the giraffe from the Zoo Babies stamp set in so saffron and added a little gold bakers twine around his neck to make him look all cute and stuff!!  The perfect little touch was adding the pool party and so saffron candy dots.  These are the perfect little things since sliced bread and I do love bread!!!
 
Supplies Used
Cardstock ~ whisper white, smoky slate, pool party
DSP ~ I am me
Stamp Set ~ Zoo Babies
Ink ~ smoky slate
Misc. ~ subtle candy dots, gold bakers twine
 
I hope you have enjoyed my take on the color challenge!  Please remember to leave some "love" as I always value and look forward to reading your comments!
 

Thursday, April 10, 2014

Set Sail with Stylin' Stampin' Squad's April Blog Hop

Thank you so much for joining us for our April Stylin' Stampin' Squad Blog Hop! This month our theme is all about "kids".  One of the things about having kids is planning a birthday party or maybe even a baby shower for a friend.  Our hop is focusing on everything related to kids.  From birthday/party cards, invites, decorations to even party favors.
 
As you hop along, please be sure to comment and show some love on every blog! We are always excited to hear from our followers! You should have just left stop #4 Kathy P. of Katrina P's Creative Corner on the Stylin' Stampin' Squad Blog Hop. If so, you are in the right spot. If a link doesn't work or you get off track, you will find the full blog hop lineup below.

With this months hop theme of "kids", I decided to do a baby shower collection.  One way to make a shower so easy to put together, is to create your own supplies for the party.  I used Stampin' Up!'s MDS software program to create all the items you will see here in my post.  Now the only thing left to do is....EAT those Yummy little cupcakes!!!
 
 
So my baby shower collection includes: an invitation, thank you cards, cute cupcake toppers and even more cute tags for the candy favors.

 
The invitation is 100% MDS. I used the High Tide DSP for the background along with the stamp set Hello Sailor and On the Go.

 
For the tags on the candy favors, I used the photopolymer stamp set, Setting Sail.  I also printed the stripped background paper from MDS and punched out the shape with the artisan punch and tiedit on with some pacific point stitched ribbon.  These cute little plastic bottles were a treasure find at Hobby Lobby.

 
With a party where you are going to received gifts, you need to have thank you cards to send out.  Again I went to work with MDS.  I printed a page of the shells DSP pattern and cut it out to layer on my piece of pacific point cardstock.  I layered the front with a label, stamped the center with the boat wheel and typed in the word "thanks".  I also stamped another layer to print out to attach to the backside for a person to write their thank you message.  I didn't want to print a whole sheet of paper for one thank you card.  I wanted to make these postcard style to maximize paper supplies, and lets face it, most people file 13 these things anyway after they get them in the mail, so no need to waste a lot of paper and ink.

 
These cute little cupcake toppers were so so easy to make.  I used the Setting Sail stamp set for the three images and layered with some cardstock circle shapes.  The background circle, again is a sheet of High Tide DSP printed from my printer.
 
Supplies Used
Cardstock ~ whisper white, summer starfruit, calypso coral, pacific point
DSP ~ high tide (MDS)
Stamp Sets ~ on the go, hello sailor (MDS) and setting sail
Ink ~ pacific point, summer starfruit, calypso coral, basic black
Misc. ~ MDS software, circle punches, artisan punch
 
I sure do hope you have enjoyed my baby shower themed projects as much as I did creating them.  Don't forget to leave some "love", before heading over to the next blog hop stop #6 Bree R. of Craft-Somnia.  She has an awesome project waiting for you to check out!
http://www.craft-somniamomma.blogspot.com/2014/04/zoo-baby-birthday-stylin-stampin-squad.html
 
 Blog Hop Participant List:
  1. Dawn S. of Dawn's Creative Chalet
  2. Erica B. of Stamping Starlette
  3. Shellie G. of Craft Smashup
  4. Kathy P. of Katrina P's Creative Corner
  5. Cynthia R. of Ink-A-Doodle Creations
  6. Bree R. of Craft-Somnia
  7. Jennifer C. of Happy 2 Scrap 4 Life
  8. Donna S. of Organized Chaos
  9. Darcy J. of DJ's Stampin' Place
  10. Tonya B. of Stampin' with Tonya
  11. Diana E. of Stampin' Fun with Diana
  12. Pam S. of Stampin' in the Sun
  13. Kim R. of Stamping with Kim
  14. Rose C. of Stampin' with Rose
  15. Darla R. & Nancy K. of Stampin' with Darla and Sisters


Monday, March 10, 2014

Sweet Baby Bunny w/ #DD-93

Hello, I'm back again for card stop #2! I can't believe I got two cards done during nap time.  It's been an easy Monday and I'm taking advantage of it, cause I don't get these days often.  This ca-ute little baby card is for The Dynamic Duo.  I have found some wonderful new challenge sites to play along with and this is one of them.  The fun thing about this challenge blog, is that it works with two colors only. 

 
I don't know why in the world I waited so long to get this cute little guy.  Well no worries, he is mine now along with the other cute stamps that come in the Baby We've Grown set.  I kept it pretty simple on the layers.  Used my circle framelit to cut out the dsp for great stamping underneath.  I added some fun candy dots and a clear button with a bow tied with white bakers twine.
 
I hope you have enjoyed my baby bunny as much as I do.  Lets all say it together....auhhhhh, isn't he CA-UTE!!!!  Leave some "love" before you leave, I really enjoy reading your comments and it gives me the mojo to go and create something else!
 
Supplies Used
Cardstock ~ blushing bride, whisper white
Ink ~ blushing bride, sahara sand
DSP ~ sweet sorbet