Friday, January 30, 2015

Celebrate with Cake! #FM195

Good Friday morning!  Today I am still in Florida at Stampin' Up's! Leadership training and having so much fun!  But before I start a new day of exciting things, its time for an all new challenge at The Friday Mashup.  Avery sure has created a fun challenge for us, so go grab those toys and play along with us.
 
This week's Mashup Challenge is:
  • Create a project with the "Sketch". 
  • Create a project with "2 different embellishments". 
  • or Mash it Up! and create a project "with the Sketch and different embellishments".

 
I had so much fun with this sketch.  It really gave me a chance to dig into my supplies of embellishments and get creative.  I hope you have enjoyed my card, leave some "love" and go inspired by our other designers!
 
Supplies Used
Cardstock ~ night of navy, whisper white
Ink ~ night of navy, crushed curry, calypso coral
Stamp set ~big day
DSP ~ birthday bash
Misc. ~ white bakers twine, brights and subtles buttons, large polka dot embossing folder

Tuesday, January 27, 2015

You Made My Calendar - Special Project for SSINK

 
Good morning!  Today I am over at Stylin' Stampin' INKspiration and its my day to share a special project with you.  To see the finished project from the Simply Created Calendar Kit, you're gonna have to click the link above and head on over to our main blog.  Come on....go click the button, you know you are dying to see what I did!!!!


Monday, January 26, 2015

You're A Classic - Masculine Monday at SSINK

 
Good morning!  Thanks for stopping by to visit me here at Ink a Doodle Creations.  Today I am over at SSINKspiration and its Masculine Monday.  You won't see me play along with this design challenge often, cause...well...I'm just not good at masculine cards.  Its hard when my access to  masculine themed stamp sets are limited.  It makes me put my extra thinking cap on and by the end of the day, with watching 3-4 kids, that can be difficult, but I think you will be proud of the quick and easy card that I came up with. 

 
I love it when DSP can be so detailed that you don't really need any stamping but a sentiment.  One of the reasons I enjoy Typeset DSP, is that it is full of wonderful detailed paper.  Maps, newspaper ads, etc. to make any card a beautiful card.
 
Supplies Used
Cardstock ~ very vanilla, basic black, crumb cake
Ink ~ basic black
DSP ~ typeset
Stamp set ~ petite pairs
Misc. ~ neutral candy dots, banner punch, natural twine, ticket tag punch 

Sunday, January 25, 2015

Coffee Warms My Heart #CYCI54

Good morning, hope everyone has been enjoying their weekend so far!  I have. Spent yesterday running errands and stocking the house with groceries for my departure next Wednesday.  Where am I going, you ask?  Well, let me tell you, I am headed out to the air port all bright and early to fly myself away to Florida for Stampin' Up! Leadership training and to have fun, fun, fun with my friend Breelin.  We are going to have an awesome time!  Now back to today, today I am sharing my project for the Designers Choice Challenge at Can You Case It?  So put your thinking caps on, grab a sketch, color combo, its your choice.  Create that fun project of any kind and link it up to our challenge!
 
I was scanning thru Pinterest the other day and came across this lovely card created by:  Wanda Guess and just loved the theme (COFFEE) and the sketch.  I put my thinking cup on (that means, I fixed myself a cup of coffee!) and went to town to CAS(E) her card.  Here is her card.....
Paper Smooches challenge card by Wanda Guess
 
and here is my CAS(E)D version....

 
I do love my Stampin' Up! supplies but sometimes I do like to pull out some of my other toys and mix them up together!  One of my favorite contraband stamp sets is the Perk Up coffee themed stamp set by My Favorite Things.  It has a lot of different coffee related sentiments and it works perfect with any kind of coffee cup/mug stamp set or die cuts.  I replaced her circle shapes with hearts and turned my card to be horizontal.  I just love the added bling of the sequins along the sides.
 
Supplies Used
Cardstock ~ whisper white, coastal cabana, sahara sand, crushed curry, calypso coral
Ink ~ soft suede, crisp cantaloupe
Stamp set ~ Perk Up
DSP ~ Best Year Ever (SAB paper pack you can earn for FREE with a $50 order)
Misc. ~ crushed curry bakers twine, in color sequins, heart from the circle card thinlit set

Friday, January 23, 2015

Woodsman Valentine #MOJO381 and #HSS203

Good morning, its Friday, Friday, Friday!  Oh what a beautiful day it is too!  One day closer to packing (well I have already done some!) and heading to Florida to attend Stampin' Up!'s Leadership training!  Yesterday I sat down to create a fun card for the sketch at Mojo Monday and combined it with the awesome color challenge at Hand Stamped Sentiments.  Both worked great together for creating a masculine Valentine with the Wood You Be Mine stamp set.  I am so glad I got this cutie.  It is so fun to have a nice masculine stamp set to play around with.

   
Here are the two challenges, and here is what I created......
 
 
Using a piece of the black and white DSP from the stacked with love pack and coloring in the hearts with melon mambo was so fun.  It really makes the woodsman stand out nicely with his matching plaid shirt.
 
Supplies Used
Cardstock ~ whisper white, melon mambo
Ink ~ basic black, black momento tuxedo, melon mambo
Markers/Blendabilities ~ smoky slate, early espresso, skin tones, soft suede
Stamp set ~ wood you be mine
DSP ~ stacked with love
Misc. ~  woodgrain embossing folder, bright candy dots, circle framelit set
 

Hello Sweet Baby! FM194

Good morning its Friday, Friday, Friday and today I'm over at The Friday Mashup!  Today we have an all new challenge.  Create a project using colors inspired by the below photo (tangerine, aqua and white) or a Baby theme, or you can mash it up and use both. 


Well I decided to stick the "baby" theme and came up with this.  I just love the lullaby DSP pack and it works perfect for boy or girl.  I even decided to pull out my sewing machine and do some simple sticking along the edges to add some texture.  I created this cute little vellum mini envelope and added some fun sequins inside to giggle and wiggle!  I added some twine and a few candy dots to tie it all together with some fun embellishments.
 
Supplies Used
Cardstock ~ crisp cantaloupe, whisper white, baked brown sugar
Ink ~ baked brown sugar
DSP ~ lullaby
Stamp set ~ baby we've grown
Misc. ~ hello you thinlit set
 
Again thanks for stopping by, leave me some "love" and head on over to catch all the details on how you can join us in our challenge.  Don't forget to go visit our other designers to see what they created!

Thursday, January 22, 2015

Waste Not Want Not with SSINK

 
Good morning!  Today over at SSINKspiration our designers were put to the test to use things laying around our desk and create something with.  Well, I defiantly have things laying around I've been meaning to use I swear!  My dad always taught me to not waste things.  Rather it be paper or the food on my plate.  So this challenge for us came at the perfect time.
 
Here is my work space showing my scraps laying around, just waiting to be used.  YES even I have little piles laying around on my desk...a neat pile but a pile in the least LOL!!
 
 
And here is what I created out of my pile....
 

 So I was able to create a treat bag as well as a card.  WOW, didn't realize I had that much in the pile!  I was playing around with embossing velum the other day for the treat bag and changed my mind but thru it in the "for later pile".  I also had this heart embossed card layer in calypso coral in that same pile.  The scrap strips with the stacked with love DSP was perfect to pull it all together. 

 
I had a circle shape in the black with dots and cut the heart out for my card then used the left over piece to create a heart shaped shaker to attach to my treat bag below.  I had a short length of black bakers twine that worked perfectly for my hanging heart.
 
 
I had this tied up black chevron ribbon actually sitting on my desk for months and couldn't find anything that I wanted to use it for, but wouldn't dare throw it away( Big NO NO!!)  Glad I didn't cause I added a couple glue dots and added it to the front of treat bag.
 
Supplies Used
Cardstock ~ calypso coral, whisper white
 Ink ~ black, calypso coral
Stamp set ~ Snuggles & Smooches, Crazy About You
DSP ~ stacked with love
Misc. ~black chevron ribbon, coastal cabana twine, basic rhinestones, heart embossing folder, mini treat bag thinlit set, circle framelit set
 
Now go forth, look at all those scraps you have laying around and see how you can turn them into something beautiful!  Leave some "love" and go see what the other designers have/had laying around on their desks!!

Monday, January 19, 2015

Creative Blog Hop!

Good morning and thank you for stopping by.  I want to send out a big Thank You to stampin' friend and all NEW Co-Designer at The Friday Mashup,  Amy Kunkle from {crazy}beYOUtiful.  She nominated me to participate in the Creative Blog Hop!  She has a fabulous blog, so be sure to go visit and leave some "love"!  Click HERE to go see her Creative Blog Hop project.

My project for the hop is....

 
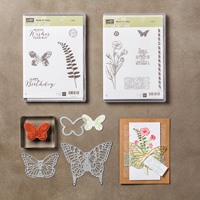
This cute little treat bag that I created using the Mini Treat Bag Thinlit Die from the new 2015 Stampin' Up! Occasions catalog.

 
Now this thinlit is made to create more of a flat version treat holder but with a few adjustments  (demo's were given a bonus way to create with it in our special Stampin' Connection magazine), I was able to create more of a 3-D bag that stands up.  Patty Bennett put together a quick guide to help you create it.  The only thing I had trouble with was her score lines as far as placement when scoring.  If you place the edge flap at the 1/2" and score, but then slide that score line up to 3/4" you will get the correct lines in the right place.  I got confused with just thinking you scored at 1/2" and 3/4" but you have to shift, (lord I hope this makes since)
 
I created my bag using the Best Year Even DSP from the SAB catalog as well as stamping with the Best Day Ever SAB stamp set.  These items can be earned for FREE with any $50 min. order.


And now to answer the questions as part of the Blog Hop!

1.  What are you working on now?
well right now I am working on finishing up swaps for Stylin' Stampin' INKspiration.  The designers signed up to make swaps using items from the Occasions Catalog.  Maybe if you stop by next week, I'll have it up and ready to share!  I'm using the set, "for peeps sake"

2.  How does your work differ from others in your genre?
this is actually a pretty tough question and had to ponder a moment before answering.  I think everyone creates in their own and different way.  That's what makes it so fun to hop on Pinterest or flip thru magazines.  You get to enjoy all kinds of styles of papercrafting.  I actually turned to a friend to ask her what she thought my style was and she said, "A classic embellisher", LOL!  I agree with that cause I love layers.  I see a lot of single layered cards with only maybe one stamped image and one or two embellishments.  Where as I like 2-3 layers min. and ribbons/twines and buttons/candy dots...bling it up Scotty!!

3.  Why do you create what you do?
usually I am creating a project for one of the design teams that I am. Stylin' Stampin' INKspiration, Can You Case It? or The Friday Mashup.  I try to pick my project geared around someone's birthday that I know is coming up or maybe a fun Holiday that would make a cute/fun gift giving idea for my sons teachers.
4.  How does your creative process work?
I try to start with a sketch or color combo.  Once I have either or both, I then pick a stamp set that fits that and the occasion I am creating for.  Once that happens, normally, I say NORMALLY, everything kinda falls into place.  Now if I haven't had enough coffee, then no telling what's gonna get created and its no plan behind it at all!!!  LOL!!
 
Thanks again for stopping by to check out my Blog Hop project, leave some "love" and be sure to continue the Hop next week (Monday, January 26th)  and visit with Donna Smit at Organized Chaos and Kim Ryden at Stamping with Kim.  All three of us are co-designers over at Stylin' Stampin' INKspiration where we have daily inspiration posts and weekly challenges.  Be sure to come by and visit us!

Supplies Used
Cardstock ~ whisper white, coastal cabana
DSP ~ best year ever-SAB item
Stamp set ~ best day ever-SAB item
Misc. ~ wooden clothespins, white cotton ribbon, calypso coral pompom trim

Sunday, January 18, 2015

Clean and Quick with CYCI#53

Good morning.  Hope everyone has been enjoying their weekend so far.  Hard to believe its Sunday already.  Make the most of it and go do something fun!  (NO cleaning, that's not fun!)  Today as you can tell, I'm paying around over at Can You Case It?  This weeks challenge is to create something "Clean and Quick".  Now normally this is hard for me, cause I love my layers and embellishment, but I'll have to say, its getting easier and easier.

 
Again, I am using the Butterfly Basics stamp set and butterfly framelit bundle.  I told you I am in love with this set.  Its so easy and fun to play around with.  You can't go wrong not matter what you do.  I started with very vanilla card base and added a layer using stampin demensionals to raise it up.  First of course, I stamped  the (what I call the honeycomb patterned) stamp three times close together in strawberry slush.  Then I stamped the butterfly (love the lacey pattern to it!) in blackberry bliss and cut it out using the matching framelit (NO fussy cutting at all!)  I also added a SS button to the center of the butterfly with some cut and shredded ribbon.  The happy birthday sentiment is stamped in smoky slate and I'm done.  Now you can't tell me that's not quick and easy?!
 
Supplies Used
 

Friday, January 16, 2015

Stamp a Stack!

 
Good morning its Friday, Friday, Friday!  Time for another fun post today with the gals at SSINKspiration.  Today our projects are based around "stamp a stack".  My thoughts were something quick and easy, yet pretty to put together several to possible give as a small gift or to use yourself if you are in need of several to send out.
 
 
I pulled out some new toys from the 2015 Occasions catalog.  I so love the butterfly basics stamp set and matching framelits. I kept them simple with only one layer stamping except for the stamped and cut out butterfly.  The colors stay the same and match the base color from card to card.  To make it even easier, I kept the twin color the same to match the stamped sentiment in baked brown sugar.  Now to mix it up, you could use matching colored twin, but I didn't want to much of a good thing. You know that, "I eat there all the time, I'm sick of it, or that "if I eat one more piece of chocolate, I'm gonna throw up"?  Well maybe not that, who can ever get enough chocolate!!!  LOL!

 
I took this close up so you could see the details.  Again each card is the same, just different colors.  I even added 4 pearls down the center of the butterfly. 
 
Thanks for stopping by, leave some "love" and go see what the other design team members have came up with.
 
Supplies Used
Cardstock ~ very vanilla, crisp cantaloupe, coastal cabana, pistachio pudding, strawberry slush
Ink ~ crisp cantaloupe, coastal cabana, pistachio pudding, strawberry slush, baked brown sugar
Stamp set ~ butterfly basics (with matching framelits)
Misc. ~ basic pearls, baked brown sugar twine
 

Triple Layer Fun at FM193

Good Friday morning!  Hope everyone is getting ready for a wonderful weekend. I know I am!  Today I am over at The Friday Mashup and Sara has come up with a great challenge for us this week.
 
 
This week's Mashup Challenge is:
  • Create a project with the "Triple Layer Technique" Tutorial HERE.
  • Create a project that's "Floral". 
  • or Mash it Up! and create a "Floral Triple Layer Project".

 
Now I have made this kind of card before but with the traditional sizes of rectangles but wanted to try something new and different.  I used circle shapes and off set them.  I also took Sara's challenge and mashed it up by adding a stamped flower and colored it with my blendabilities.  Stampin and coloring this flower was so fun.  I love how its all brought together with the twine and the apoxy dots make using crystal affects!
 
Supplies Used
 

Monday, January 12, 2015

Be Mine! #SSINKCS17 Card Sketch Challenge

 
Good Monday morning!  I hope everyone had a lovely weekend.  Today I am over at SSINKspiration and today is an all new card sketch challenge.  I just love the fun sketches that Breelin whips up for us.  Come on over to our main blog site, get the details and go create something to share with us!
 
 
Here is the sketch we have to work with.....

 
and this is what I came up with!  You can never have to many valentines card floating around and I am just in love with the You Plus Me stamp set that is in the new 2015 Occasions Catalog.  Its just so fun and cute.  I finally received my heart embossing folder that was on back order for a while and decided to break it in.  I cut out a circle using a piece of the black and white patterns from the Stacked with Love DSP stack.  I cut a couple banners from the same pack and added some twirled black bakers twine behind the stamped heart shape. 
 
Supplies Used
Cardstock ~ whisper white
Ink ~ real red
Stamp set ~ You Plus Me
DSP ~ stacked with love
Misc. ~ heart embossing folder, black bakers twine and heart shapes both from the treat bag thinlit set, circle framelit set
 
I hope you have enjoyed my card sketch challenge project.  Don't forget to leave some "love" and come create with us!  I can't wait to see your project!