Friday, February 28, 2014

Herringbone Technique w/ CTS#66

Happy, Happy Friday everyone!  I don't know about you but boy I am ready for the weekend.  This week has been pretty easy, but I am always ready for the weekend to get here.  Tonight after dinner I headed to my craft room oasis and got busy putting together a card for a challenge site I have never played before.  I love my favorite blogs but I am always happy to come across new ones too!  This card is for a sketch challenge over at Cas(e) this Sketch.  Its such a nice simple sketch too!

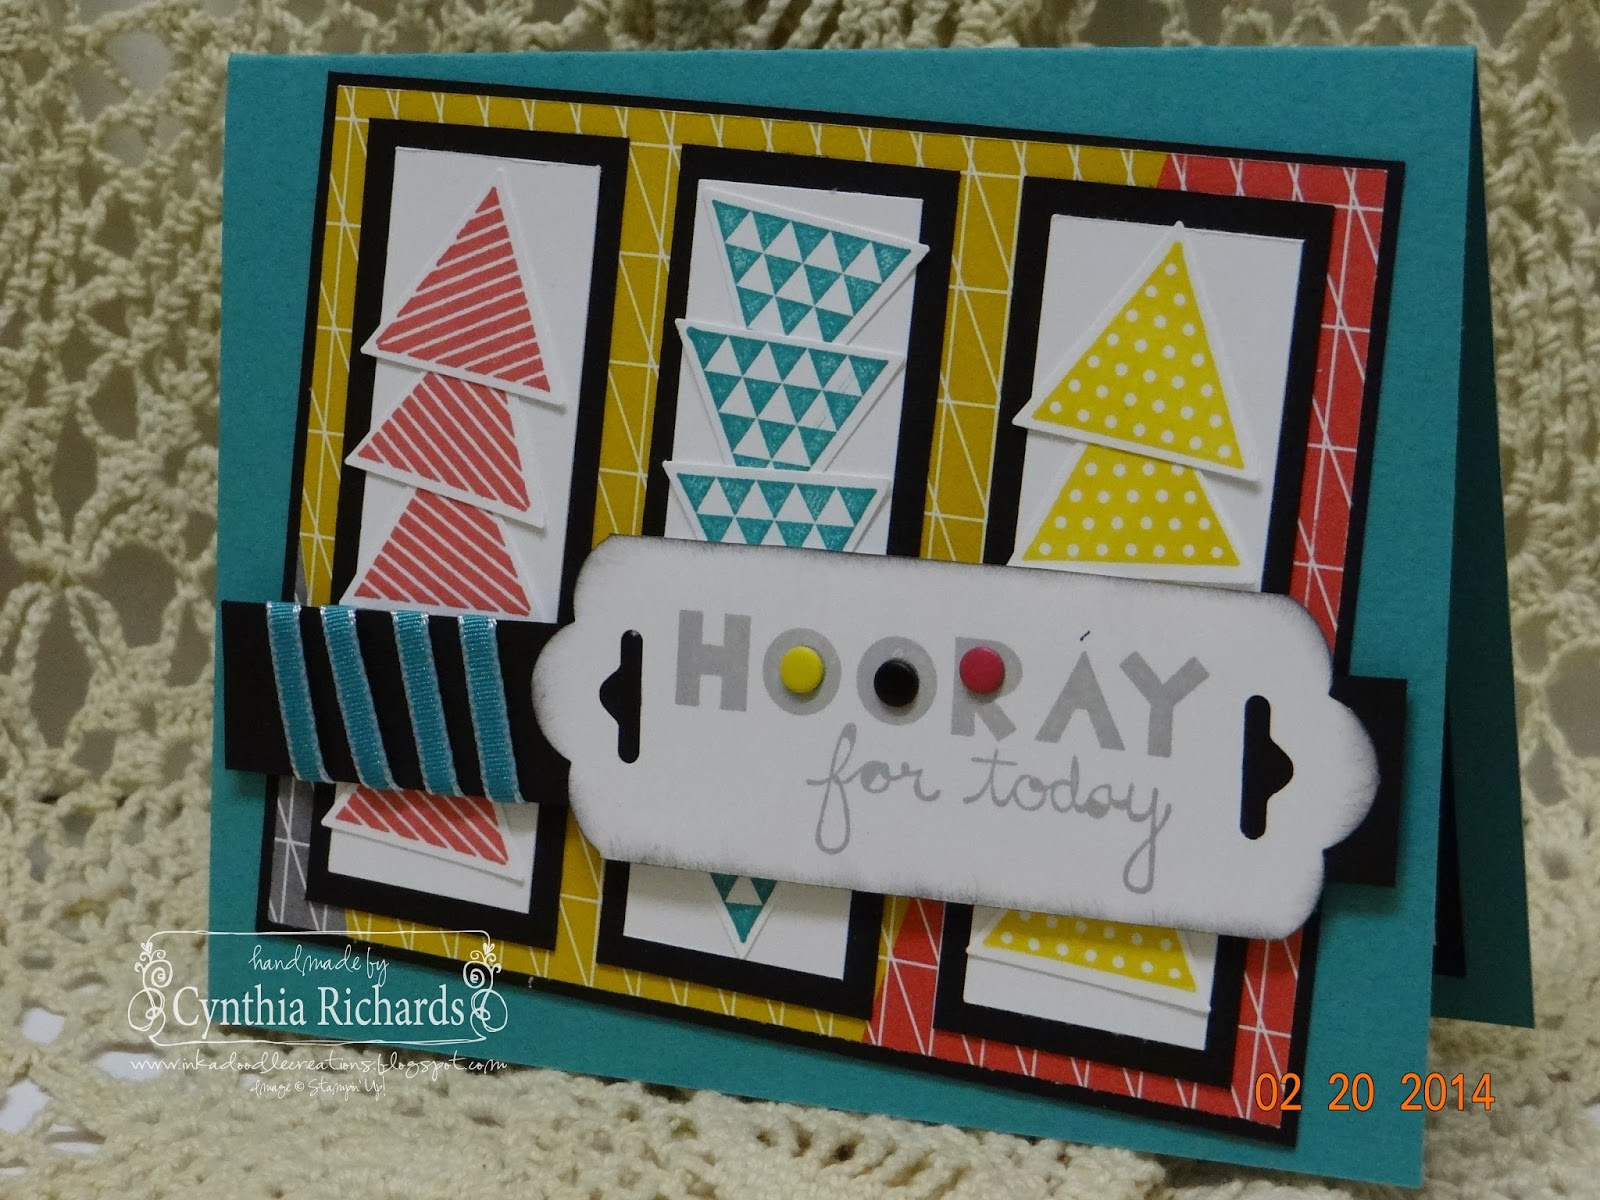
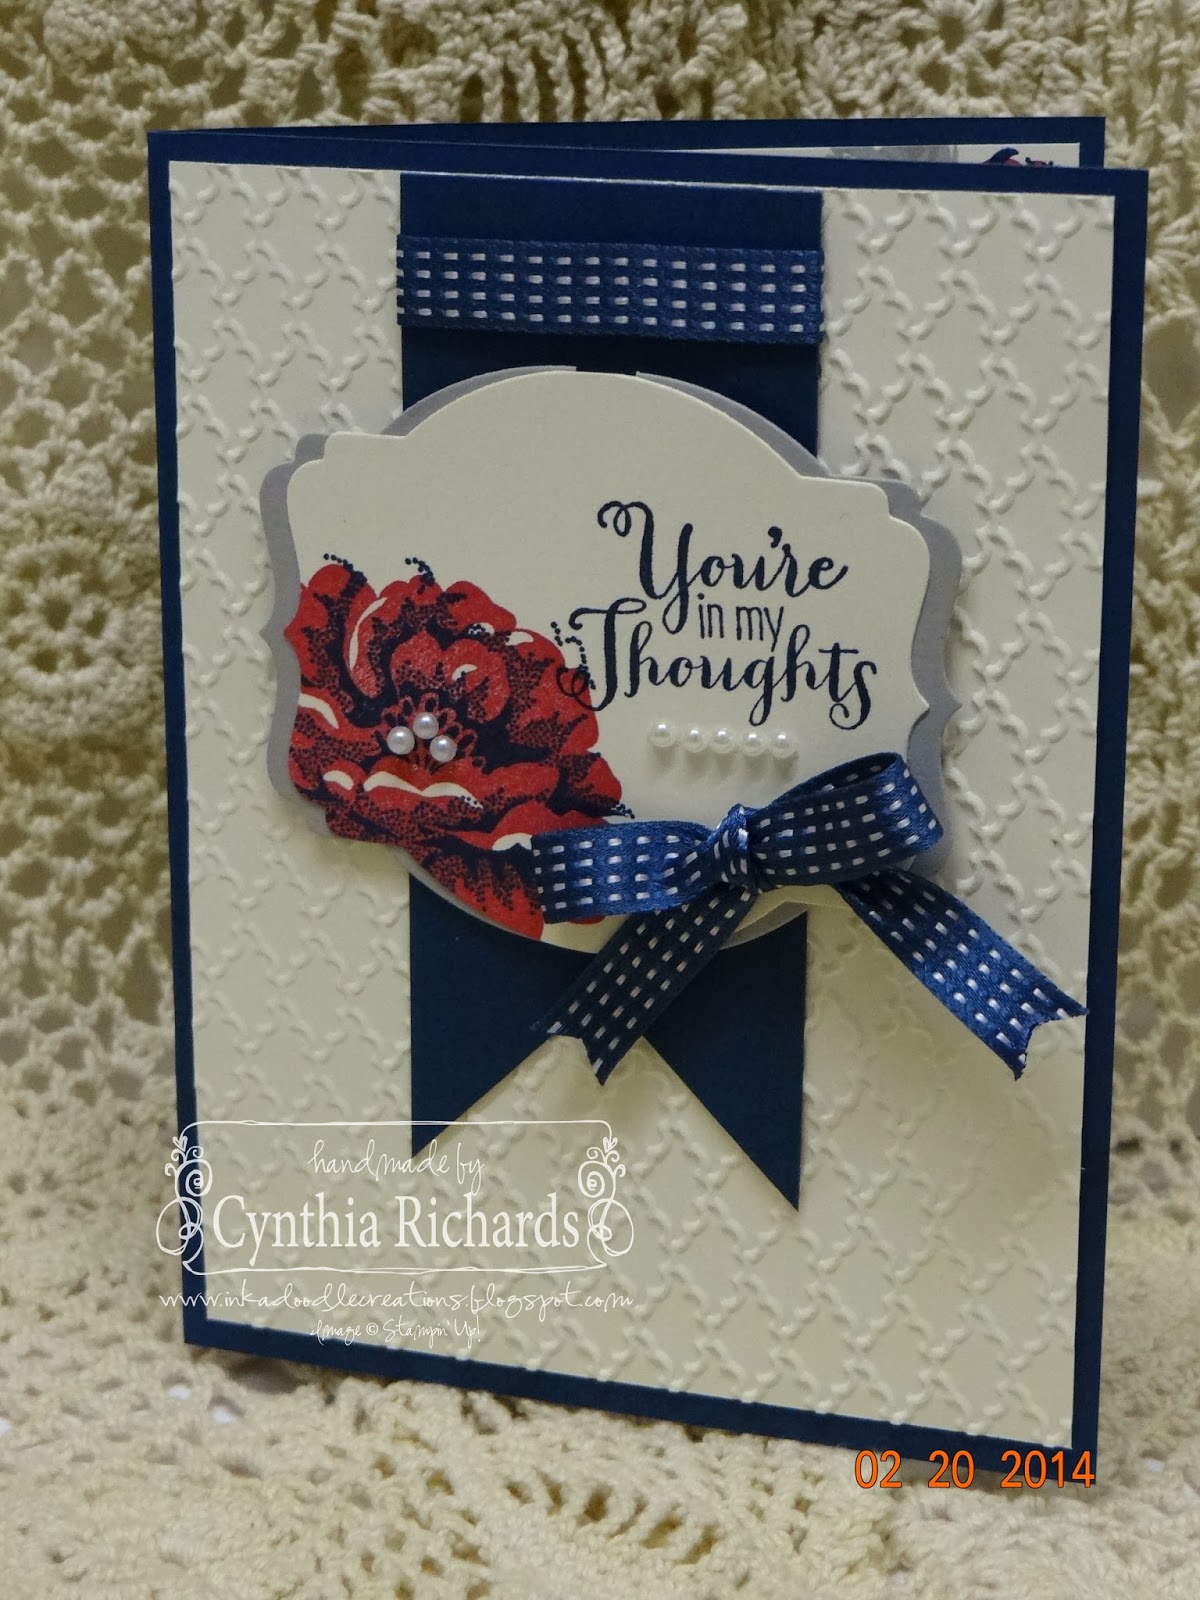
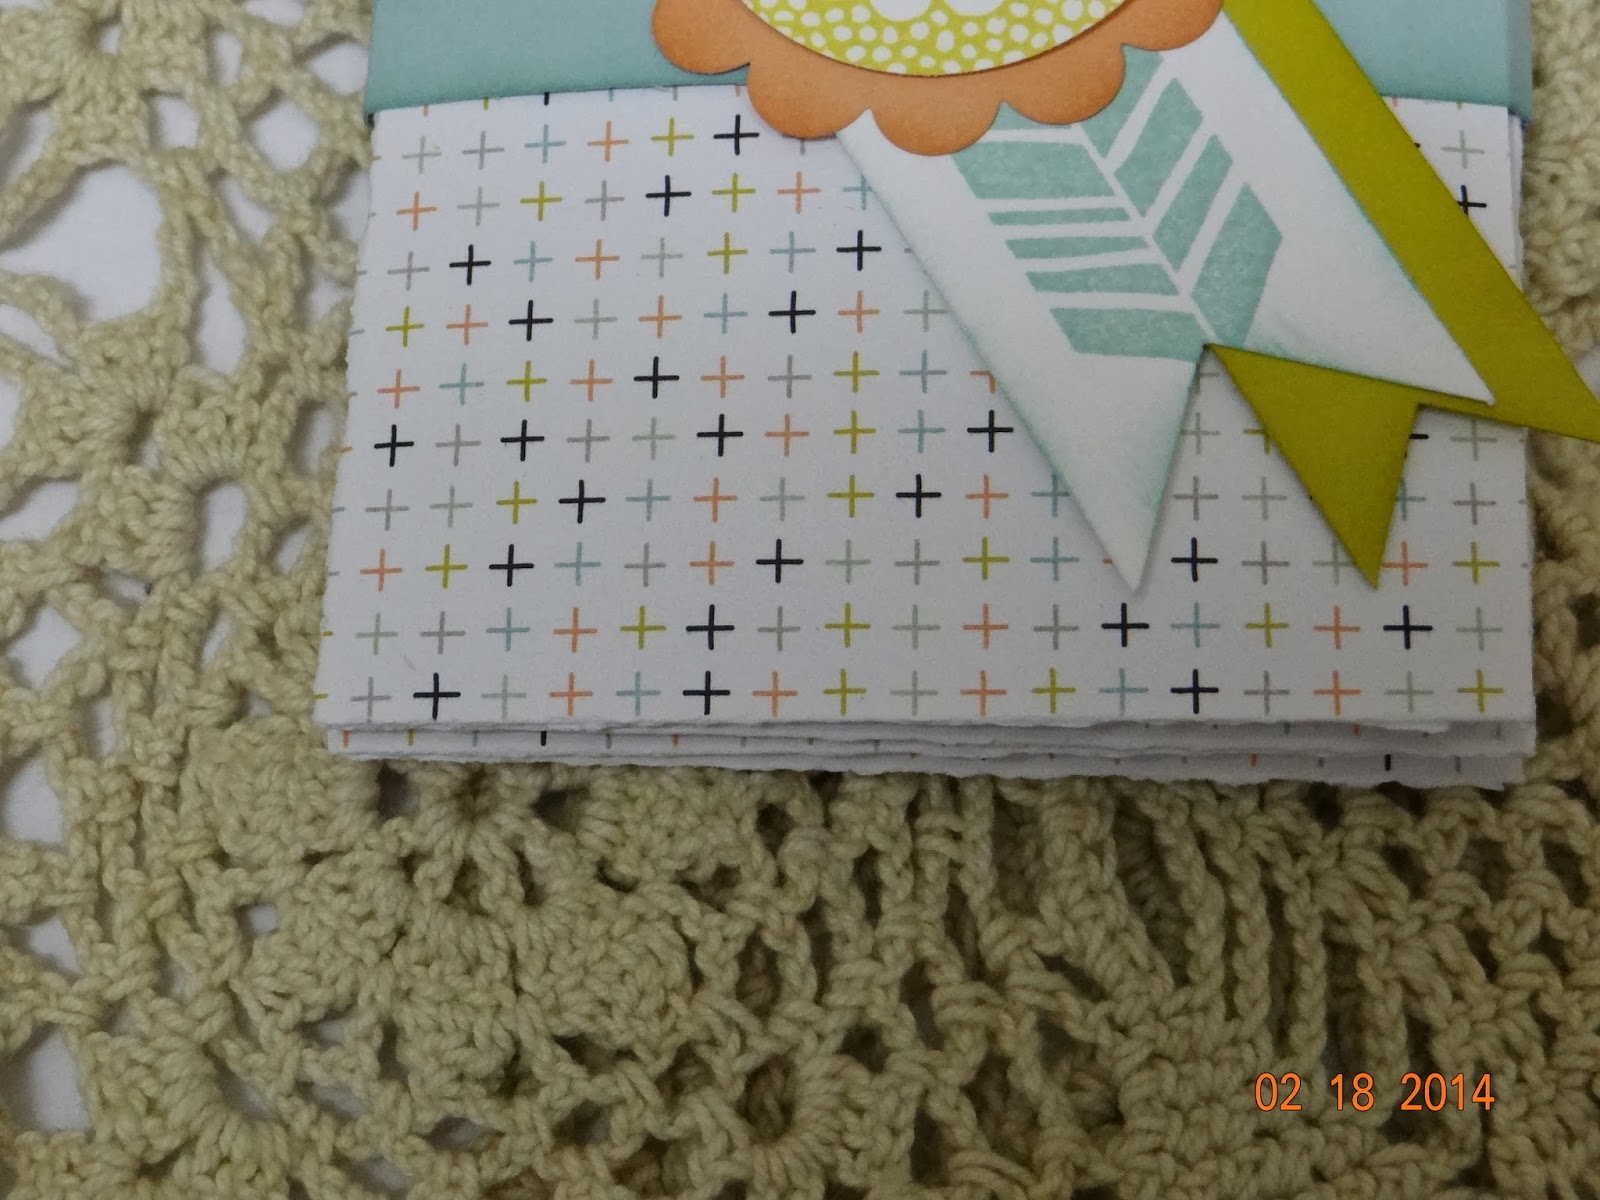
I have been wanting to try the "herringbone technique" for a while now, and this sketch was the perfect time to break it out.  I also for the first time opened up and used the Fresh Prints DSP stack.

I even on the inside, added the pattern in the corner, but made sure to leave plenty of room for writing.
 
Thanks for stopping by, I hope you have enjoyed my project.  Don't forget to leave some "love", as I always enjoying reading feedback!
 
 
Card Supplies
Cardstock ~ crumb cake, whisper white, coastal cabana, real red
DSP ~ fresh prints DSP stack
Misc. ~ scalloped circle card thinlits for the "yay", subtles buttons, white bakers twine, coastal cabana ruffled in color ribbon, houndstooth folder

Tuesday, February 25, 2014

Rainbow Bright Sketch HSS #180

Well it started out cloudy and cold this morning with some snow flurries, but it turned out to be a bright and sunny day!  Which brightened my mood so to celebrate I created a bright and cheerful card for the sketch over at Hand Stamped Sentiments!

 
So one of my favorite techniques to do as a background is the "sunburst technique".  It is so fun and simple and makes any card look nice.  I've done this fun technique before but not as a rainbow, so off I went to work!  I cut all my pieces, glued them down to my base of 5" x 3-3/4" then ran it thru the Big Shot with the decorative dots folder.  Punched out some fun clouds using the cupcake punch and put together my hot air balloon using three small ovals and the bottom part of the cupcake punch!  Speaking of cupcake...wait a minute...yum..yum...(licking my lips right now!!) ok now I'm better!!  I baked cupcakes on Sunday and well the darn things are still in the house and taunting me, so I just took care of one!!

 
On the inside I used the left over strips I cut for the front and glued them down and embossed them too.  Then I topped it off with a white layer for writing.  Added a couple clouds and some more gold twin and I'm done!

 
I hope you have enjoyed my project, please don't forget to leave some "love".  I love reading your comments!  Head over to Hand Stamped Sentiments and join in the fun sketch challenge this week.
 
Supplies Used
Stamp Set ~ Banner Blast
Cardstock Colors ~ strawberry slush, real red, pumpkin pie, crushed curry, wild wasabi, pacific point, midnight muse, elegant eggplant, whisper white and basic black
Punches ~ cupcake punch, banner punch and small oval punch
Misc. ~ gold bakers twine, gold sequin trim, decorative dots folder, beautiful wings embosslits 
 
http://www.handstampedsentiments.blogspot.com/2014/02/hss-sketch-challenge-180.html


Monday, February 24, 2014

Butterfly Wishes w/ Paper Players #184

Good Monday morning!  I am keeping my fingers crossed for a wonderful week with no madness!!  I finished up my card last night for the sketch over at The Paper Players, and I had so much fun with it.  For me this is a simple sketch.  It was kinda hard at first, cause I love layers, but I was good and added no main layers to the card base at all.  I can't wait to here what you think!

I started out using Basic Birthday DSP for my banners and finished it off with a punched butterfly and or course added some matching twine and a cute button.  I love how Stampin' Up! makes it so easy to coordinate items together!  They are AWESOME like that!!

I had a layer already cut for the inside, but needed a small circle for the outside, so I cut it out in the lower corner but instead of getting a new whole piece, I still used it and just added a butterfly to the center.  I added a matching banner as well as two small ones at the top.  I just love the mini banner punch in the Sale-a-Bration brochure.  You can earn it for FREE with any $50 order!  Hurry though, cause this special offer ends March 31, 2014.
 
Supplies Used
Stamp Set ~ express yourself (hostess set)
Cardstock ~ crisp cantaloupe, whisper white
DSP ~ Basic Birthday
Punches ~ Elegant butterfly, banner punch
Misc. ~ circle framelit, basic pearls, crisp cantaloupe twine (SAB item), in color boutique buttons, paper doily
 
All these items can be purchased HERE!
 
I hope you have enjoyed my take on this fun sketch.  Don't forget to leave some "love" before heading over to play along too!


Sunday, February 23, 2014

Triangle Play with FM148

Happy, happy weekend! After my long run on this beautiful day, I headed to my craft room to play with my toys!!  I have been wanting to join in the fun challenge with The Friday Mashup, but didn't quite know what I wanted to do.  I knew I wanted to do a kinda quilt pattern, so after looking around, I found a pattern that worked! 

I wanted it to bright and cheerful so I used colors of pacific point, tangerine tango and so saffron.  I stamped and punched out several triangles and got to work playing around and arranging my pattern to fit my white card base layer. I wanted blue in the middle so it was a perfect space to put my stamped sentiment.  The Label Love set worked perfectly!!!

I added some stamped triangles to the inside, and was done!  I will add my birthday greeting later.
 
Don't forget to head over to The Friday Mashup to see the rules and how you can join in the fun!
 
Supplies Used
Stamp Set ~ geometrical and label love
Cardstock ~ pacific point, whisper white and so saffron
Ink ~ tangerine tango, so saffron, pacific point
Punches ~ triangle and artisan label
Misc. ~ pacific point 1/4" stitched grosgrain ribbon, candy dots

Thursday, February 20, 2014

Hooray for Today!!!! FMS124

Moving on to my second and final post for today!  I am so happy to be sharing both of my challenge cards with you today!  This one is for the sketch challenge over at Freshly Made Sketches!

This layout was a little tricky for me, only because I had in mind another stamp set to use, but another card had not only been made with it, but almost in the same way I was gonna use it...that doesn't happen to often, but great minds think a like sometimes...  then I decided to go bright and bold, so I started with the perfect stamp set and DSP for that job...Geometrical stamp set and Kaleidoscope DSP.  Yep that worked!!! 

and of course I added some matching triangles inside to pull it all together.
 
 
Supplies Used
Stamp Set ~ Geometrical
Cardstock ~ blasic black, whisper white, Bermuda bay
DSP ~ Kaleidoscope
Ink ~ strawberry slush, Bermuda bay, crushed curry, and smoky slate
Misc. ~ triangle punch, bright and neutral candy dots, 1/8" Bermuda bay ribbon
 
I hope you have had fun with my card challenge.  Please leave some "love", as I always enjoy reading comments for the cards I make!

Stippled Blossoms with HSS179 and PPA192

Well if you checked out my card in a box post from this morning, you read that yesterday was not a good day, but today has been much better!  I provide childcare in my home and well nap time can sometimes be good and sometimes not so good.  That was the root of yesterday's disaster.  Usually during nap time, I head to my craft room and play around with a card challenge or work on an upcoming project for my stamp club.  Well today went so well, that I was able to knock out not one but two card challenges, yep you heard that right...TWO cards!!!

This card is for Hand Stamped Sentiments! and Pals Paper Arts!  HHS has a great color challenge while PPA has a fun sketch challenge.  You should head over to both and check out the details.

I broke out Stippled Blossoms as my choice of stamp set.  Not sure why I don't use this set more.  It is a really lovely stamp set.  The colors worked perfect for how I wanted my card to look.

I even dressed up the inside with some layered blossoms too.


2-20Sketch192
 
I hope you have enjoyed my card for this color challenge.  Don't forget to leave some "love".  I always enjoy reading comments from my followers!!
 
Supplies Used
Stamp Set ~ Stippled Blossom, Best of Greetings
Cardstock ~ midnight muse, smoky slate and very vanilla
Ink ~ rose red, midnight muse and smoky slate
Misc. ~ midnight muse stitched in color ribbon, fancy fan embossing folder, basic pearls

Petal Parade Card in a Box

Good Thursday morning!  Yep glad its Thursday and Wednesday is long gone, see ya later!!  It was a rough one.  Hopefully today will be better.  This past weekend I worked on my demo project for my March stamp club coming up, but last night I wanted to create another one to show how you can have fun decorating them in so many ways.  So what in the world am I talking about you say?  Well I'm talking about the darn cute little cards in a box, everyone has been seeing around all over the internet and pinterest!

I came across Tina Weller's great blog and she has am awesome video tutorial and a printable pdf that you can print off for later.  She shows great step by step instructions on how to create this adorable box and it made it super easy to create my own version.  So without further ado.....

 
I wanted to showcase the Petal Parade stamp set and Sweet Sorbet DSP.  Two great items out of the 2014 Sale-a-Bration catalog.  These two items are available to earn for FREE with a $50 purchase until March 31, 2014!  I wanted to add lots of layers to this one to show how it can be dressed up a lot or kept simple like our version for March club.
 
Supplies Used:
Stamp Set ~ Petal Parade, Banner Greetings
DSP ~ Sweet Sorbet
Cardstock ~ sahara sand, crisp cantaloupe, pistachio pudding, summer starfruit, basic black, whisper white
Ink ~ Summer starfruit, crisp cantaloupe, pistachio pudding, pool party, sahara sand
Misc. ~ Basic black chevron ribbon, sweet sorbet accessory pack twine
 
All these items and more can be purchased HERE!


Wednesday, February 19, 2014

French Fry Style!!

http://www.ssinkspiration.blogspot.com/
Good morning bloggers and thanks for joining me here with Stylin' Stampin' INKspiration!  Today our post is all about "boxes"!  I am excited to share my fun shaped boxes I made for each of my two boys to hold their Valentine's Day treat.  Even though we don't go all out and make to big a deal about Valentine's Day, I still like to give the boys a small candy treat.  Cory and Andrew both love Hershey Kisses, so it is never hard to decide on what candy treat to get.

Even though my boxes are real red, I added some tempting turquoise and some grunge splatter to make them a little more boyish!

If you know me, I am not one to throw away just anything.  If its not me keeping the plastic containers that the Crisco butter sticks come in, its the French fry box that my fries came in from dinner last Friday!!  I have always wanted to make a cute candy treat box using this shape.  All I did was carefully take apart the container and use it as a template.  I traced around the edge and marked my score lines.  Easy Peasy!!  Next time, I want to make a little mini version!! 

The "Be Mine", stamp from the A Round Array stamp set, worked perfectly for this special box.  I layered it with the Label Love stamp set and matching punch.
 
Supplies Used:
Stamp Sets:  A round array, gorgeous grunge, label love
Cardstock:  real red, black, whisper white and tempting turquoise
Ink:  real red
Punches:  7/8" scalloped circle, 1" circle and artisan label punch
Misc.:  real red 1/4" stitched grosgrain ribbon, McDonalds French Fry container for template
 

Tuesday, February 18, 2014

A Little Something Special!


Good morning bloggers!  Thanks for stopping by.  I have a special post today to share with everyone over at Stylin' Stampin' INKspitation! 

Here is just a teaser snapshot for ya!  If you want to see the whole project along with instructions (hint hint!)  then click on the photo and go check it out!!  I can't wait to read your comments!
http://ssinkspiration.blogspot.com/2014/02/four-pocket-folder.html

Monday, February 17, 2014

Retro Fresh SMILE!

http://www.ssinkspiration.blogspot.com/
 
Good morning bloggers and thanks for joining me with Stylin' Stampin' INKspiration as we kick off this fine Monday with an awesome page layout challenge!! 

http://www.ssinkspiration.blogspot.com/
 
Ok, so I have to admit, that I am getting a little bit more curious with this MDS for scrapbooking.  After going to my last weekend retreat and only coming back with 19? pages done, I realized that something needs to change.  Even though I still prefer the hands on method of scrapbooking, I do enjoy the quickness and mess free of doing it thru MDS!! 

 
So here is what I came up with.  It was tricky trying the find just the right photo to highlight on this page.  I scanned high and low thru photos and came across this great single picture of our lab, "Loompa".  This was taken of her sitting so lady like in the kitchen one day.  You know, cause she's so "prim and proper"!!  I call her, my "little lady", even though there's nothing little about her! LOL
 
I just love my newest MDS download.  Its the Retro Fresh DSP.  I think it worked perfect with Loompa's blonde fur (almost vanilla like)!
 
Supplies Used:
MDS - Retro Fresh DSP, top note punch, scalloped circle punch, circle punch, paw print from patterned pets and lrg splatter from extreme elements.
Colors used -  coastal cabana, very vanilla, baked brown sugar, so saffron and tangerine tango
 
Any of these downloads can be purchased HERE!
 
Thanks for dropping by to see my layout creation.  Don't forget to head over to the main blog page for SSINKspiration to see all the layouts created by our talented design team members!  I hope we have INKspired you to join in our layout challenge with us!!

Saturday, February 15, 2014

Weeeooo-Weeeooo Kinda Birthday with Freshly Made Sketches #123

Good Saturday morning!  I am so excited for this weekend!  Getting fitting for a new pair of running shoes today and a family reunion dinner tomorrow with some running in between for both days!  I hope the weather stays nice!
 
I had some time to slide in some stamping while kids were getting ready.  I wanted to play with the fun sketch over at Freshly Made Sketches and create a birthday card for a little boy.
http://freshlymadesketches.blogspot.com/2014/02/freshly-made-sketches-123-sketch-by-jen.html
So this is what I came up with...
So I wanted to play around with one of my "never have been used before" stamp sets and went with You're My Hero.  So glad I did, cause I had so much fun with the set.  I couldn't make the whole car appear in each circle, so I decided to punch different parts of the car each time.  I also highlighted one by stamping it in red and layering it with a basic gray circle.  I added my sentiment in a banner tail and popped on some fun candy dots! 

On the inside, I added some more circle shapes and again, highlighted part of the car in red.
I hope you have enjoyed my card.  Don't forget to leave some "love" before you leave!!
 
Supplies Used:
Stamp set ~ You're My Hero
Cardstock ~ real red, pool party, whisper white
Ink ~ real red, pool party, basic gray
DSP ~ I am me
Punches ~ 1", 1-1/4" and 1-3/8" circle punch
Misc. ~ neutral, bright an subtles candy dots, real red 1/4" stitched grosgrain ribbon
 

Thursday, February 13, 2014

Happy Birthday with CCMC289

Well as I am posting this card that I created today, I just realized that the time frame to enter has ended, but oh well, I'm posting it anyway!  Better late than never I always say!  I had created this card with the sketch challenge over at Create with Connie & Mary.

 
and here is what I created...
With part of my goal for the New Year, I am finding that I need a lot of Birthday cards!  So far I have been able to make on time and send out B-day cards to family and friends!  This card is bright and cheerful and sure to make anyone happy on their birthday!  One of the fun things I like about this card is the layered banner in the corner using the Birthday Basics DSP.

I liked it so much, that I created another layered banner using it again on the inside.  I will fill in my birthday message when I'm ready to send it off.
 
CCMC289
 
Supplies Used:
Stamp Set ~ Geometrical
Cardstock ~ Bermuda bay, summer starfruit, very vanilla, raspberry ripple
Ink ~ Bermuda bay
DSP ~ Birthday basics
Misc. ~ Bermuda bay 1/8" ribbon, itty bitty punch pack, decorative dot folder, candy dots


Glitz and Glimmer Watercolor with PP182

Welcome to Ink a Doodle Creations and thanks for stopping by!  Today has been a fun filled day of crafts.  I started out the day with shoveling some snow so I could get out the door.  Myself and the boys created a pretty cool sledding path down the hill in our yard.  We had a blast out in the snow!  Hope our track stays in tact so we can do it all again tomorrow!

After my toes, fingers, tooch and face were so called I really couldn't feel them anymore, I decided it was time to come in, eat some warm chicken noodle soup, grab a cup of coffee and head to my room to get my craft on!  And that I did!!  My first up card to create was a Birthday card and knew I wanted to play around with the great colors from over at The Paper Players.   Head on over to their blog and check out the details to join in the fun with this great color challenge!
 
One of my favorite stamp sets right now is the Happy Watercolor.  It is so each to stamp with for easy coloring and fun to fussy cut and layer the petals with.  I also am in love with the card created using the scalloped tag punch, that I've been seeing around.  I think what I love most about this card is the how the gold sequin trim and gold glitter paper brings it all together!

http://www.thepaperplayers.blogspot.com/2014/02/challenge-182-color-challenge-from-nance.html
 
Supplies List
Stamp Set ~  Happy Watercolor and Express Yourself
Cardstock ~  midnight muse, crisp cantaloupe, very vanilla and gold glimmer paper
Ink ~  Midnight muse and crisp cantaloupe
Punches ~  2" oval and 1-3/4" oval, modern label punch
Misc. ~  gold sequin trim and crisp cantaloupe twine


Get Bundled with Stylin' Stampin' Squad February Blog Hop

http://www.ssinkspiration.blogspot.com/
Thank you so much for joining us for our February Stylin' Stampin' Squad Blog Hop! Sale-a-Bration is in full swing and it's one of the BEST specials that Stampin' Up! provides every year! Each of the stops along our hop will give you a bundle of items that you can purchase that will total around $50 and give you a FREE Sale-a-Bration item!! 
 
 As you hop along, please be sure to comment and show some love on every blog! We are always excited to hear from our followers! You should have just left stop number #1 on the Stylin’ Stampin’ Squad blog hop – Diana E. with Stampin' Fun with Diana. If so, you are in the right spot. If a link doesn’t work or you get off track, you will find the full blog hop lineup below.

You won't want to miss these exclusive Sale-a-Bration items: 


 In thinking of what items I would put together for my bundle offer, I wanted to make sure it included a simple but versatile stamp set.  These are the four different cards that I created with the items in my bundle.  As you can see, even though I used the same stamp set, embossing folder and DSP pack, all four cards look totally different.  One of the things that helped was that I used a different color for each card. 
 
Happy Watercolor Bundle -
Earn the Sweet Sorbet DSP pack for FREE
- Paper Doilies, $2.95, #129399
-  2013-2015 In-Color Market set, $14.95, #131260
-  2013-2015 In-Color Variety 8-1/2" x 11" cardstock pack, $6.95, #131200
-  Happy Watercolor Clear Stamp set, $21.95, #133191
-  Modern Mosaic Embossing Folder, $7.95, #129984
Total Bundle $54.75


Close ups of the Pistachio Pudding and Summer Starfruit cards.  On each card, I made sure to use the matching ink color as the cardstock base for the inked background behind the flower.  This background stamp in the Happy Watercolor stamp set is a great way to still add color without having to color in the flowers with markers.

Crisp Cantaloupe and Pool Party.  Since I was using the in-color marker set, it made it easy to color right on each stamp and color the cardstock edge with the stamped flower image.  This just added a little extra POP to help it stand out on the card.
 
I hope you have enjoyed the cards created using my happy watercolor bundle.  Now hop on over to stop #3, Jennifer C. with Happy 2 Scrap 4 Life .  I know you can't wait to see her special bundle!!
http://happy2scrap4life.blogspot.com/2014/02/sale-bration-bundle-ssi-blog-hop.html
 
 
 Blog Hop Participants:
  1. Diana E. of Stampin' Fun with Diana
  2. Cynthia R. of Ink-a-Doodle Creations You Are Here!
  3. Jennifer C. of Happy 2 Scrap 4 Life
  4. Kathy P. of Katrina P's Creative Corner
  5. Darcy J. of DJ's Stampin' Place
  6. Kim R. of Stamping with Kim
  7. Pamela W. of Stinky Tofu
  8. Erica B. of Stamping Starlette
  9. Donna S. of Organized Chaos
  10. Tonya B. of Stampin' with Tonya
  11. Kristina M. Mama's Sanity
  12. Bree R. of Craft-Somnia
  13. Dawn S. of Dawn's Creative Chalet
  14. Anastasia R. of Stampin' Blondie
  15. Darla R. & Nancy K. of Stampin with Darla and Sisters
  16. Pam S. of Stampin' in the Sun
  17. Heidi B. of Stuck on Stampin'


Monday, February 10, 2014

Yippee Skippee Madness!!!


Good morning bloggers and thanks for joining me here with Stylin' Stampin' INKspiration.  Today is a Monday, and you know what that means.....its time for another great challenge!  This Monday is our Card Sketch Challenge.  Make sure you head over to our main blog to check out all the details and join us for a little sketchy fun!

http://www.ssinkspiration.blogspot.com/


 One of my new years goals was to stay on top of making and sending out birthday cards for family and friends.  Thought you might like to know, that so far, I am doing well!  This card is going to be heading to my husbands cousin for her Birthday!

I just loved this layout, cause it was fun and easy!  The best kind, right?!  I went with the mosaic madness theme here, cause Mondays are always a little full of madness around this household!

 
Kept the inside pretty simple with a whisper white layer, stamped along the side with matching mosaic tiles.
 
Card Supplies:
Stamp set:  mosaic madness, Yippee Skippee
Cardstock:  calypso coral, whisper white, coastal cabana, smoky slate
Ink:  calypso coral, coastal cabana, basic black
DSP:  Quatrefancy Specialty window sheet
Misc.  Banner framelit set, basic pearls, mosaic punch, modern label punch, mosaic embossing folder
 
All these supplies can be purchased HERE!
 
Thanks for stopping by.  I hope I have INKspired you to create and play along with our fun sketch!