Thursday, June 26, 2014

Art Inspired

 
Good morning and thanks for joining me here today with Stylin' Stampin' INKspiration.  Today we are sharing projects created with an "Art Inspired" touch.  I will have to say, this was out of my comfort zone and I had dropped out from this challenge for us design team members. But I got to thinking.....what stamp set do I have that would make creating such a background as our example art piece easy.   Well I almost tripped and it hit me...no joke, this stamp set was laying on the floor and I almost tripped on it, BAHAHA!!!!!
 
http://www.claude-monet.com/impression-sunrise.jsp
So this was our "art inspired" picture to go by....

 
And here is my take on it.  I used the Works of Art stamp set and with colors of lost lagoon, soft sky, so saffron, hello honey, wild wasabi and pistachio pudding, created this art piece.  Well, I don't know about "art piece", but I think it turned out pretty cool for never creating such a thing before.  The sail boats are from the Settin' Sail stamp set and I shadowed it by stamping on a window sheet and reversing the location to just below the main one.  I also did the same technique for the reflection of the moon.

 
On the inside, I used a few of the same colors and stamped a simple border background.
 
Supplies Used
Cardstock ~ whisper white, hello honey and wild wasabi
Ink ~ lost lagoon, soft sky, wild wasabi, pistachio pudding, so saffron and hello honey, night of navy
Stamp Sets ~ Settin' Sail, Work of Art
Misc. ~ gold sequin trim, sponge daubers, clear window sheet
 
These items and more can be purchased HERE
 
I hope you have enjoyed my "art inspired" project.  Don't forget to leave some "love" and head on over to our main blog to see the other great creations from our design team members.

Wednesday, June 25, 2014

Bloom with Hope for PP201

Good morning and thanks for visiting my blog today.  Todays challenge card is for the sketch over at The Paper Players.  I love simple sketches like these.  Here is the sketch....

 
and here is what I create...
 
 
One of my favorite designer series paper packs right now is Typeset.  I not only love the black and white color but I love the thin newspaper texture it has.  I used the large flower from the Bloom with Hope hostess set and stamped it twice on a newspaper sheet.  I fussy cut it out and attached in layers.  I also stamped the center of the flower on cherry cobbler and added some black colored pearls to the center.
 
 
On the inside I stamped the same flower in black on top of a very vanilla circle and added a few matching banners to the left of it.

 
Supplies Used
Cardstock ~ basic black, very vanilla, cherry cobbler
Ink ~ basic black
Stamp set ~ Bloom with Hope
DSP ~ Typeset
Misc. ~ basic pearls, black sharpie marker, venetian crochet trim, banner punch, project life cards & labels framelit set
 
Thanks again for stopping by. I hope you have enjoyed my challenge project.  Leave some "love" and come back tomorrow to see what I have been creating.


Tuesday, June 24, 2014

Watermelon Treat Basket and Card!

 
Good morning and welcome back!  I hope everyone had a wonderful "dry" weekend.  We had a wonderful time.  Our family spent the weekend at the Great Wolf Lodge, where I got to enjoy the sun, water and lazy times chill'n by the pool with my nose stuck in a book.  Today I am over at Stylin' Stampin' INKspiration.  Our design team members are sharing projects perfect for "summer fun"!  When someone says Summer, the first thing I think of is "watermelon".  Our family loves it and goes through several of these tasty little things.  Now here is my question for you when it comes to watermelon (leave a comment with your answer and you could be the lucky winner of this cute little set!  When I eat watermelon, I like to sprinkle a little salt on it, DO YOU?! 
 
 
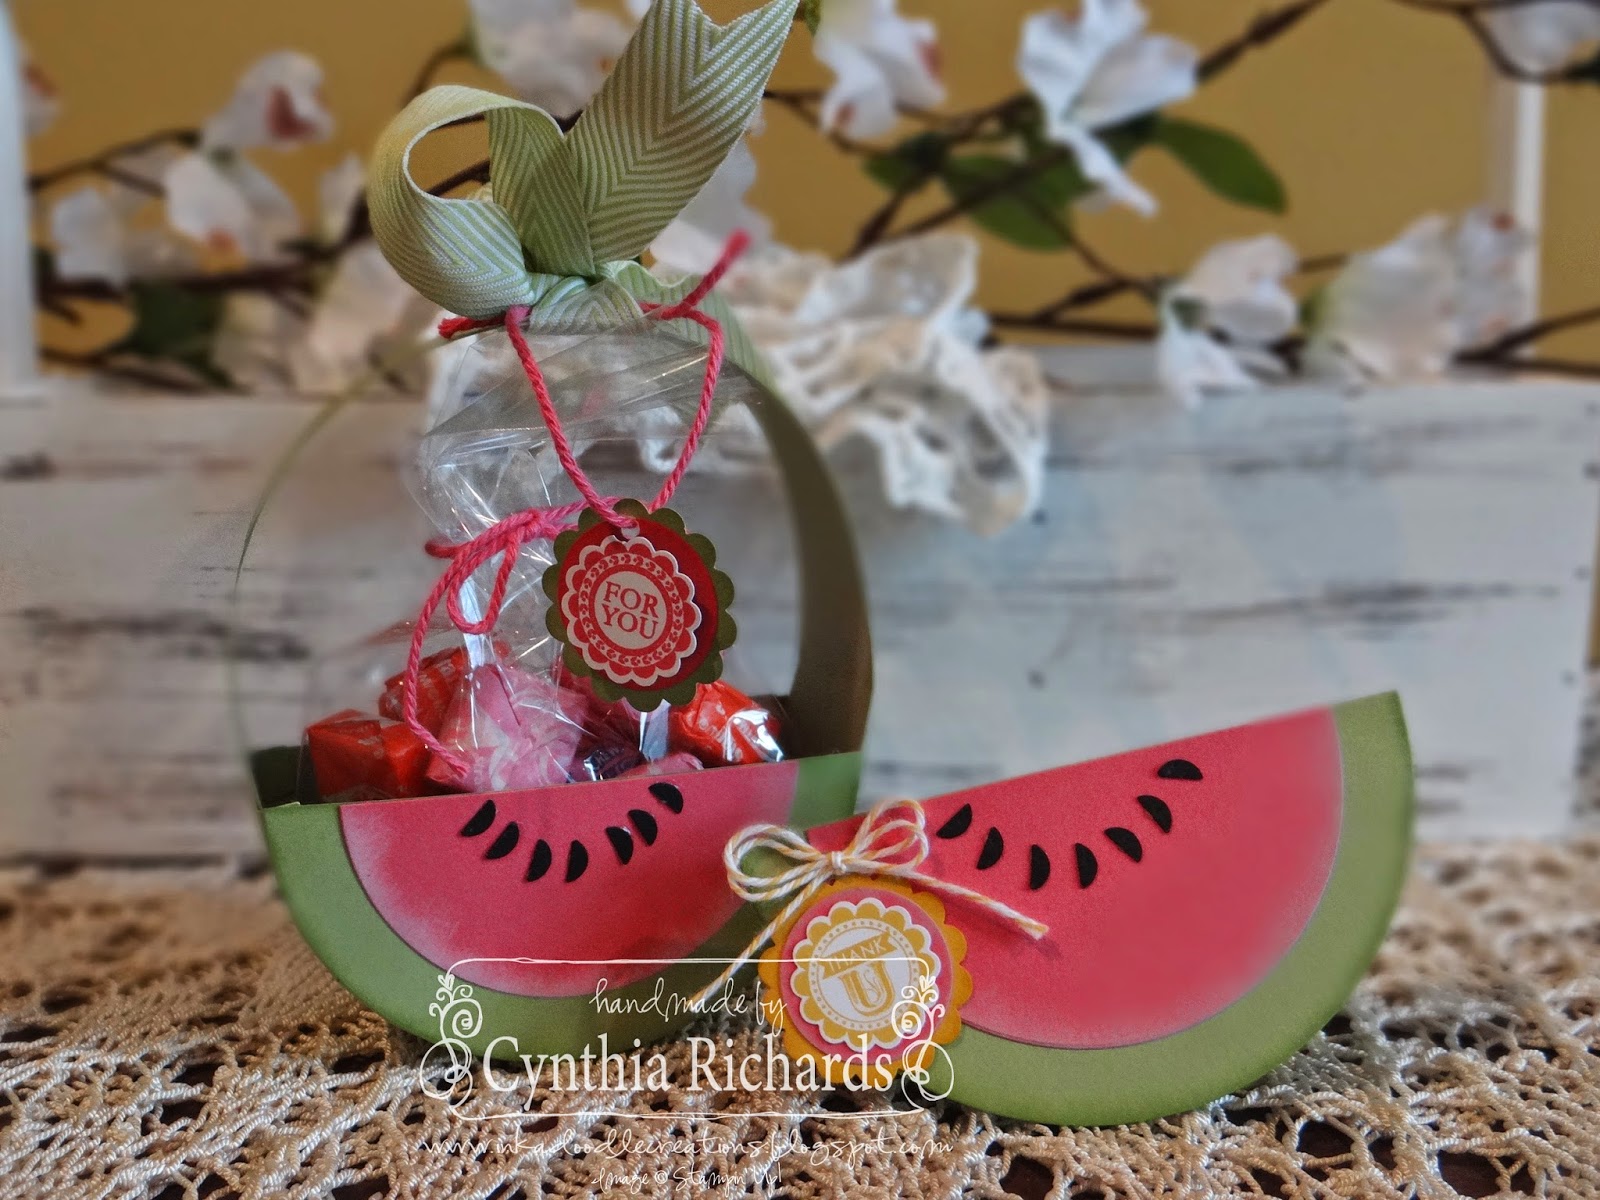
The basket is made using the circle framelit set.  I went with lighter shades of red and greens for my watermelon and used pear pizzazz and strawberry slush.  The strawberry slush has been inked on the edges with whisper white craft ink to give the elusion of real watermelon.  I created the little "for you" tag with the scalloped circle punches and the Around Array stamp set.

 
I used one of the plastic cello bags that came in my June Paper Pumpkin kit to fill with starburst for a little summer treat.

 
I had to make a matching little mini card to write my "thank you" note in.  This again is a circle framelit, scored and folded in half, then decorated the same as the basket.  This time, I added a cute little crushed curry bakers twine bow and a little tag.

If you want to try and WIN this cute little watermelon basket and matching card, leave a comment and answer the question from above!  #1 Random winner will be selected on Friday, June 28.

Supplies Used
Cardstock ~ pear pizzazz, basic black, crushed curry, whisper white, strawberry slush
Ink ~ whisper white, strawberry slush, crushed curry and pear pizzazz
Stamp Sets ~ Around Array
Punches ~ 1" circle punch, 7/8" & 1-1/4" scalloped circle punch, 1" scalloped circle punch
Misc. ~ crushed curry bakers twine, pear pizzazz chevron ribbon, circle framelits
 
Again thanks for stopping by.  Leave some "love" and head over to our main blog to see what the others have created.


Monday, June 23, 2014

Pinwheel Fun with PCCCS#98

Good evening!  I know its kinda late and not normal for me to post this late in the day, but well, like we all sometimes do, I waited to the last minute to get my challenge card done for the fun sketch over at Paper Craft Crew!  But hey, better late than never, right?!

Paper Craft Crew Card Sketch #98
 
So here is the challenge sketch.....

 
And this is what I came up with!  Ever since I received my June My Paper Pumpkin Kit, I have had pinwheels on the brain.  So what better fun, than to make one using the Confetti Celebration DSP and make it the focal point of this bright and cheerful birthday card. Since my pinwheel is small and I didn't want a think stick on my card, I used an ordinary toothpick.  Not just for picking your teeth in this house!!!  BAHAHA!!!

 
On the inside, I created a few banners in different widths and lengths using the same DSP with some simple layers, leaving still plenty of room for a hand written message.
 
Supplies Used
Cardstock ~ basic gray, whisper white, crushed curry, pistachio pudding
Ink ~ strawberry slush
Stamp Set ~ And Many More
DSP ~ Confetti Celebration
Misc. ~ regal candy dots with petal brad, tiny triangles folder, strawberry slush thick bakers twine
 
I hope you have enjoyed my take on this sketch challenge.  Leave some "love", and make sure you stop by my blog tomorrow to see the cute summer themed project bundle I created for over at Stylin' Stampin' INKspiration.....you might have a chance to WIN the set!!!

Friday, June 20, 2014

Project Life Brought to Life!!

 
Good morning, its Friday, Friday, Friday!  Our family has a fun and exciting time planned this weekend.  We are headed to The Great Wolf Lodge.  For those who don't know, its an indoor water park and you stay in this beautiful rustic lodge.  Today over at Stylin' Stampin' INKspiration, we are sharing pages and projects created with Project Life.  Project Life is a fast and easy way of scrapbooking for those who don't have the time, money or just simply want an easier way to preserve those memories.

 
So just yesterday, I sorted all my pictures from Stampin' Up's! 2013 Convention trip and started placing them in my project life page sleeves.  Project Life is not easy for me, (as strange as that may sound, cause its made to be so easy, right?!)  Well I do scrapbook, but I am a traditional scrapbooker and this is totally opposite of how I do it and design pages, but I wanted to go through the process, so I could be able to help answer questions and share the experience with my customers.

 
Before any journaling was done, I took a picture to show the cards I that chose from the Everyday Adventure Kit.  Love all the bright colors, designs and phrases that come in this kit.  I also used a couple of items from the matching Everyday Adventure Accessory Kit.  
 
I hope you have enjoyed my simple Project Life page.  Leave some "love" and be sure to go visit the other design team members to see their projects!
 
Supplies Used
Project Life Everyday Adventure Kit and accessory pack. Multi pack of page pockets.

Thursday, June 19, 2014

Big News with HSS188

Good morning and thanks for stopping by to visit my blog and see my latest project.  Todays card is for the sketch challenge over at Hand Stamped Sentiments.  I had last week, my new box of toys show up and I was able to use a couple of those new items!

 
This card was so fun with to create with my new toys.  I got to use the new Confetti Celebration DSP along with new in color of tangelo twist.  I also got to use the new Big News stamp set for the larger "it's your birthday" sentiment, the candles and the woohoo banner across the top.

 
On the inside, I brought in a matching ribbon banner as on the front and stamped the inside with "enjoy the fuss".  Its another great sentiment that included in the Big News stamp set.

 
Supplies Used
Cardstock ~ basic gray, whisper white, tangelo twist
Ink ~ crushed curry, pistachio pudding, basic black, tangelo twist
Stamp set ~ Big News
DSP~ Confetti Celebration
Misc. ~ crushed curry chevron ribbon, foam dots
 
I hope you have enjoyed my challenge card.  Don't forget to leave some "love"!

Wednesday, June 18, 2014

Firework Technique!


Good morning!  Today over at Stylin' Stampin' INKspiration I am sharing for my individual post, a new technique using an everyday household item......
Click the link above and go check out all the details!


Blended Bloom with Mojo350

Good morning!  I don't know about how the weather is where you live, but here in Virginia, its been hot, hot, and humid...Yuck!  I can take the heat, but when you throw in the humidity, that's when I stay in.  So if its been really hot where you are too, be safe with the heat and make sure you drink lots of water!

Todays card is for the sketch over at Mojo Monday.  I really had so much fun with this sketch.  When I saw the circle in the middle, I knew I wanted to break out the Blended Bloom flower and color it with my blendabilities from Stampin' Up!  Can I just say these things are AWESOME!  I have never been good at coloring, except with crayons the old fashioned way, but these blendabilities make it so darn easy to color.

 
The flower is colored in daffodil delight and I highlighted the center with some colored rhinestones.  Another great thing I love about blendabilities, you can color on pearls, rhinestones, bling and it won't rub off!  I started with a card base of Bermuda bay and layered it with a white layer, that I embossed with the new tiny triangles folder.  My background layers are using the new Confetti DSP and highlighted with two strips of Bermuda bay ribbon and accented with a clear vintage faceted button.

 
On the inside, I added down the side and along the bottom a layer of the same mini triangle DSP and a strawberry slush layer behind that.  I stamped in basic black, the "Woo-Hoo" from the Bravo Photopolymer stamp set.

 
Supplies Used
Cardstock ~ whisper white, Bermuda bay, strawberry slush
Ink ~ basic black, momento ink
Stamp Sets ~ blended bloom and bravo
DSP ~ confetti
Misc. ~ bright candy dots, Bermuda bay ribbon, basic rhinestones, Bermuda bay bakers twine, vintage faceted buttons, daffodil delight blendabilities, tiny triangles embossing folder
 
I hope you have enjoyed my take on this weeks fun sketch!  Come visit me tomorrow to see what I've been working on next!

Monday, June 16, 2014

A Mother's Day Kiss June Layout Challenge with SSInk

 
Good Monday morning!  Its time for our June Layout Challenge over at Stylin' Stampin' INKspiration.  We hope that you will come play along!  Our design team members have done a great job with our sketch this month.  Don't forget to go visit each blog to see what they have created.  Our layout challenge this month is Project Life inspired.  This can be done in My Digital Studios, using actual Project Life supplies or creating your own page just using the layout.  As always, just have fun!!!

Here is the fun sketch.....

 
And here is what I came up with.  I wanted to create a second page to one I created as a selfie last month.  It finishes up my Mother's Day pages.  I really did have fun creating this page.  Having the Project Life Adventure cards really made it easy and simply to pull together.  The three flowers are the burlap embellishment ones.  I just recolored them to match my page.  I added a black brad to the center of each, did a little journaling and I'm done and ready to move on to the next project on my list!
 
Supplies Used
My Digital Studios Software
Kits: Everyday Adventure Project Life Card Collection, burlap accessories, black brads


Friday, June 13, 2014

Whats Red, White and Blue all Over? PP199

Good morning! Its Friday, Friday, Friday!  Now that's just one word I never get tired of hearing!!  I have a pretty laid back weekend ahead, thank goodness.  My normal run early, get groceries, do little cleaning and play, play, play!!  Sunday is Father's Day, we I'll take a long run early, then get ready to take my husband out for breakfast (his choice), then we have to take my son over to Luray for the week.  He is staying with my parents to help take care of my sisters dogs while she is on vacation!

Todays card is for the color challenge over at The Paper Players.  I almost forgot that I wanted to play along, thank goodness they send out a reminder to play along.  So I finally got my hands on the Work of Art stamp set (it had been on back order for a short while), but not worries, I had plenty of other new toys to keep me busy with, like the new stars framelit set.  Which is what I used to create these awesome layered stars on my card.

 
I started out with a crumb cake card base and stamped it with the zig zag stamp from the Work of Art set in night of navy.  I then cut and layered with whisper white and real red.  I used the three smallest sizes of stars to cut out in all three colors.  I even sponged around each to help them pop.  The finishing touch is the celebrate on the white banner and the piece of silver bakers twine.  I added a basic rhinestone to the white and red star for some added bling!

 
On the inside, I cut out three stars and placed them in the corner, leaving plenty of room for that special hand written message.

 
Supplies Used
Cardstock ~ crumb cake, whisper white, real red, night of navy
Ink ~ night of navy, real red, crumb cake
Stamp sets ~ and many more, work of art
Misc. ~ Star framelit set, silver bakers twine, basic rhinestones, banner punch
 
All these supplies and more can be purchased HERE!  If you are still in need of a new catalog, please contact me and I will be glad to send you one!


Thursday, June 12, 2014

New Catalog Premiere Stylin' Stampin' Squad June Blog Hop

 
Good morning and welcome to Stylin' Stampin' Squads June Blog Hop!  This month we are super excited to be sharing projects and ideas made from products from the all new 2014 Stampin' Up! Annual Catalog.  We hope that by the end of the hop, we have inspired you to go create and have fun!  Have that pen and paper ready, cause we know that you will want to add some new items to that "wish list"....yes....we know you have one (we all do)!!  This will be our last blog hop for Stylin' Stampin' Squad, but don't cry....we will continue a monthly blog hop, but it will be with our design team members over at out main blog, Stylin' Stampin' INKspiration, so be sure to come visit us in July!
 
As you hop along, please be sure to comment and show some love on every blog! We are always excited to hear from our followers! You should have just left stop number #1 on the Stylin' Stampin' Squad Blog Hop - Darcy J. with DJ's Stampin' Place. If so, you are in the right spot. If a link doesn't work or you get off track, you will find the full blog hop lineup below.
 
Just like everyone right now, its hard to really pin point a #1 favorite item from the new catalog.  I mean, every time I pick up the darn thing, I find something new and exciting.  I've already had to redo my "wish list" at least twice, but that's ok, the good thing about this new catalog, is that there is something for everyone and I have a whole year to get my goodies!  One of the first items that I did add to my shopping cart on June 2, was the Flower Patch Bundle.  This is a two step stamping set. The bundle comes with a photopolymer stamp set and the matching framelit set for easy cutting out.  With all the different layers in this set, the possibilities are endless as to the different flowers you can create.  Another thing I also love about this set, is that it comes with three sentiment stamps. 
 
Flower Patch by Stampin' Up!Flower Fair Framelits Die by Stampin' Up!Flower Patch Photopolymer Bundle by Stampin' Up!


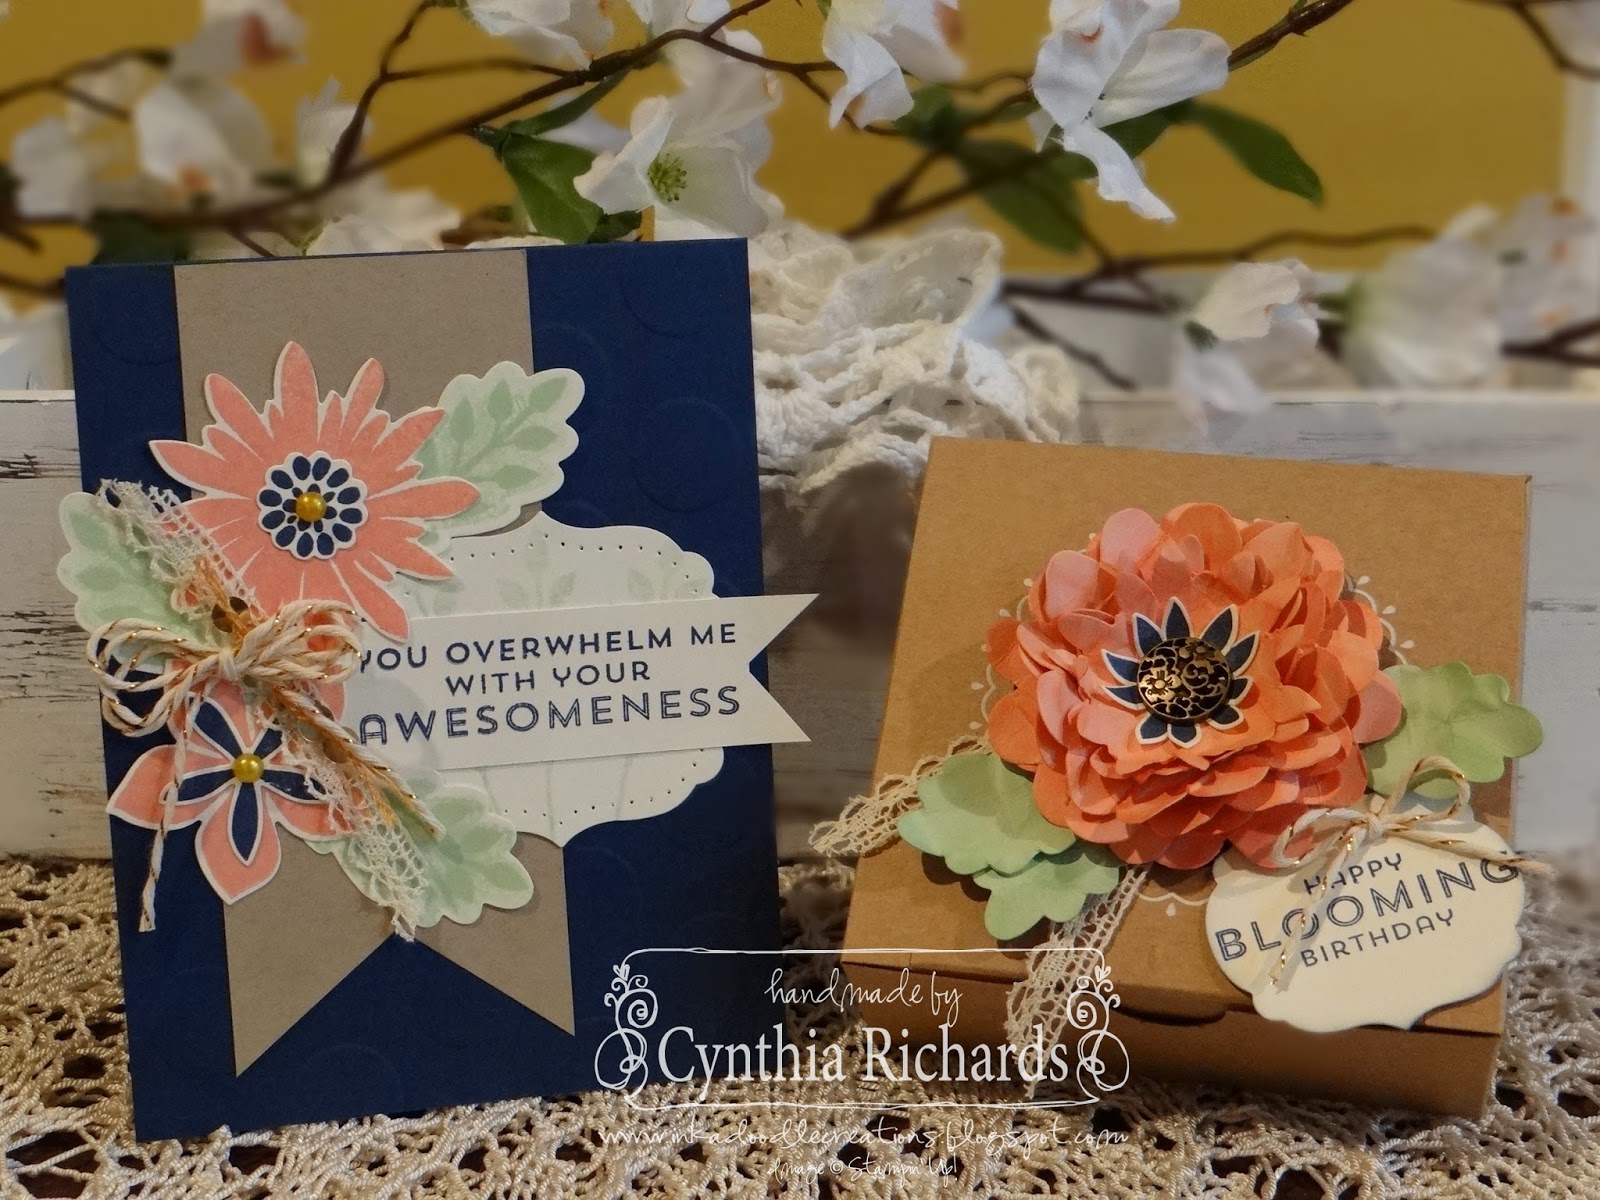
For my hop projects, I decided to create a card and decorate a box.  This set will be given to my Mom for her Birthday.  I plan to put some jewelry in the box.

 I decided to use the color combo of night of navy for my base, which I embossed with the new large polka dot folder, the banner is using crumb cake and the flowers and leaves are stamped in crisp cantaloupe, pistachio pudding and night of navy.  For some fun bling and accents to my card, I tied a triple looped bow using the gold bakers twine, cut a piece of the new venetian crochet trim and a cut piece of gold sequin trim.  I colored two basic pearls in the darkest shade of daffodil delight blendabilities and added them to the center of each flower.
 On the inside, yes, we can't forget the inside.  I stamped a matching flower from the outside and added some leaves around it.  Making sure to leave room for a nice hand written message.
 A close up of all the outside goodies!
 Now the box is one of our many different sized boxes we offer.  This one just happens to be the decorative window gift box.  It comes in a pack of 6, so you have plenty to decorate and give later as you need them or great to decorate for maybe birthday party favors.  The only flower stamp I used, was the night of navy center for the flower.  The rest I used only the framelits.  I cut several of each out in crisp cantaloupe, crumpled them up in my hands and inked the edges.  I did the same for the leaves.  I punched holes in the center to hold together with an antique brad.

I hope you have enjoyed both my projects, leave some "love" and head over to stop #3,Diana E. of Stampin' Fun with Diana , I just know you are gonna love what she created!
Diana E. of Stampin' Fun with Diana

 
Blog Hop Participant List:
  1. Darcy J. of DJ's Stampin' Place
  2. Cynthia R. of Ink-A-Doodle Creations
  3. Diana E. of Stampin' Fun with Diana
  4. Tonya B. of Stampin' with Tonya
  5. Donna S. of Organized Chaos
  6. Kim R. of Stamping with Kim
  7. Pam S. of Stampin' in the Sun
  8. Bree R. of Craft-Somnia
  9. Rose C. of Stampin' with Rose
  10. Heidi B. of Stuck on Stampin'

Tuesday, June 10, 2014

50% Off My Paper Pumpkin June Kit

https://mypaperpumpkin.com/en/?demoid=2090060
Ever thought of signing up and giving My Paper Pumpkin a try?!  Well now is the time, but hurry this special offer ends tonight. 

My Paper Pumpkin is a special surprise monthly kit that is delivered right to your door step.  It includes all supplies (except maybe adhesive and scissors) to create the projects that the kit contains.  Each months kit will be different.  Kits will include but not limited to, an ink spot, a limited edition photopolymer stamp set and envelopes, paper, dies...etc....

The kit costs $19.95 (includes s/h and tax already).  All you need to do is sign up once, enter in your personal info. along with a debit/credit card and you are set to go!  You can skip a month or cancel at any time with no penalty, but I promise you, you won't want to miss any of these exciting kits!

Two things to remember when signing up:
1) Don't forget to enter me Cynthia Richards, Troy, Virginia 22974, demo #2090060 as your demonstrator!

2)  Don't forget to enter in the special promo code:  JUNE2014 to get 50% off your June kit!

Use this link, or click the 50% off picture above to be directed to site for sign up!
https://mypaperpumpkin.com/en/?demoid=2090060

Redeem by June 10, 2014, 11:59 PM (MT). You’ll get June’s kit for 50% off and your subscription will resume billing at the retail price starting in July.

In the Gold w/ FabFri43

Good morning and thanks for visiting me here at Ink a Doodle Creations!  Today I want to share with you the card I created for the fun sketch over at Fab Friday.  This little card is for a friend of mine.  Some of us gals participated in a 30 day squat challenge and for a little extra incentive for them to keep going, I offered up to those who checked in every day a chance to win a $20 gift card to either Dick's Sportings Good or Barnes and Noble book store.  Well I had three ladies, besides myself that checked in every day and held in there to the bitter end, with the last day being #250 squats!!  The winner of the gift card went to Diana Eichfeld and she chose the Dick's gift card.  I created this card in gold, cause she earned the "gold" prize!!!  Great job Diana!!!  Its in the mail today my friend!

 
For my card, I embossed a layer of gold foil paper with the arrow folder. Stamped three of the word phrases from the new Bravo Photopolymer Stamp Set.  I stamped in versa mark and heat embossed the "to" banner from the "way to go" stamp and used a foam dot to raise it up.  I also used my triangle punch to spread them across the bottom to follow the sketch layout.  The watercolor wonder washi tape was used on the sided as well as for two of the triangles.

 
On the inside, I punched out a few more triangles and scattered them off to the side.

 
The gold bakers twine and gold sequin trim adds a nice finishing detail.
 
Supplies Used
Cardstock ~ calypso coral, whisper white, gold foil paper
Ink ~ versa mark, calypso coral
Stamp set ~ Bravo
Misc. ~ gold embossing poweder, gold bakers twine, gold sequin trim, triangle punch, watercolor wonder washi tape, arrow embossing folder
 
All these supplies and more can be purchased HERE!
 

Monday, June 9, 2014

Bravo!! June Card Sketch with SSInk

 
Good Monday morning!  Its the second Monday, and you know what time it is???  It's card sketch time over at Stylin' Stampin' INKspiration!  Challenge time is always a favorite time for us design team members, cause we can't wait to see what you, our followers, are gonna create along with us.  So be sure you head on over to our main page, check out the rules and play along!
 
 
So here is our fun sketch.  Lots and lots of cute little banners...now for my take on it.
 
 
So the one thing I did was flip it to its side.  I am so super excited for June to be here, because that means our new Stampin' Up! catalog has went live and everyone can now get new toys!  All what comes with new toys, but "play time" of course!  And play, I have!  I pulled out a lot of new items for this little cutie.  First I started by picking what DSP I wanted to work with to create all my little banners with.  I decided to go with, Lullaby.  Then I pulled my base color from that, Hello Honey.  I layered with baked brown sugar and embossed my white layer with the returning decorative dots folder.  I stamped "con grat YOU la tions" from the new photopolymer set, Bravo!  This is a special set, that I got to earn for FREE thru a Stampin' Up! promotion.  One of the wonderful perks of being a demonstrator with this wonderful company.  They are always giving us extra ways of earning new toys for FREE!  Now the fun part came in when I decided to do a little different with the coastal cabana twine.  I decided to braid it, kinda like a rope or someone's hair and wrap it around.  Fun idea, huh?!  Yea, I thought so too!!

 
On the inside, I embossed a small area, on angle, at the top and bottom with the matching dots folder.  Then I used some left over banners that I had cut out for the front and placed them at the top and bottom as well, but making sure to leave room for that hand written message that needs to go inside.

 
Supplies Used
Cardstock ~ hello honey, whisper white, baked brown sugar
Ink ~ baked brown sugar
Stamp Set ~ Bravo!
DSP ~ Lullaby
Misc. ~ decorative dots folder, coastal cabana twine, neutral candy dots, coastal cabana blendabilities to color the white candy dot.
 
Are you interested in becoming a Stampin' Up! demonstrator so you too can earn some FREE new toys, earn extra income and play from home?  Meet new friends and enjoy doing what you love best with benefits?  Well, I'd love to talk with you and answer any questions you may have to help get you strarted.  Don't have any questions and you are ready to sign up now?  Then click HERE and get started!  Stampin' Up! is offering a special limited time price of only $50 to all those who join between now and June 30, 2014.  This is a perfect time to join such a wonderful company!
 
I hope you have enjoyed my take on this months card sketch.  I hope you have gotten INkspired and will come create with us!  Don't forget to leave some "love", and head on over to see what the other design team members have created with our sketch.